
日本語
電気製品は、安全のための注意事項を守らないと、人身への
危害や火災などの財産への損害を与えることがあります。
この取扱説明書には、事故を防ぐための重要な注意事項と製品の取り扱いかたを
示しています。この取扱説明書をよくお読みの上、製品を安全にお使いください。
お読みになったあとは、いつでも見られる所に必ず保管してください。
この「取扱説明書」ではレンズごとの使いかたを説明していま
す。使用上のご注意など、レンズに共通したご注意や説明につ
いては別冊の「使用前のご注意」でご覧頂けます。
必ずご使用の前に、本書と合わせてよくお読みのうえでご使用
ください。
このレンズは、ボケ味に徹底的にこだわって開発したマニュアル
フォーカス専用のレンズです。アポダイゼーション光学エレメン
トの採用により、滑らかで美しいボケ味を提供します。このレン
ズには、
F No.2.8
〜
5.7
(
T No.4.5
〜
6.7*
)のあいだで無段階に
絞りが設定できるように絞りリングが搭載されており、前ボケ、後
ボケの効果を最大限に活かすことができます。これまでのレンズ
ではできなかった独創的な映像表現をお楽しみください。
* T No.
(
T
ナンバー):レンズの透過率を考慮に入れた、実質的なレンズの
明るさを示す値。このレンズの開口径はF
2.8
ですが、アポダイゼーショ
ン光学エレメントの使用により、光量的にはT
4.5
、すなわち通常のF
4.5
のレンズと同じ明るさになります。レンズ上の絞り表示の値、カメラの
表示部に現れる値、露出決定の際に使用する値もすべて
T No.
になりま
す。このレンズでは、
T No.
を通常の絞り値としてお使いください。
本機はソニー製αカメラで使用できる、
A
マウント用レンズです。
使用上のご注意
E
マウントカメラでお使いの場合は、別売のマウントアダプターをご使用
ください。破損のおそれがありますので、レンズを
E
マウントカメラに直
接取り付けないでください。
レンズを取り付けてカメラを持ち運ぶときは、カメラとレンズの両方を
しっかり持ってください。
ピント合わせにより繰り出されたレンズ部分でカメラを保持しないでく
ださい。
フラッシュ使用時のご注意
カメラ内蔵フラッシュ使用時には、レンズフードをはずし、
1
m以
上離れて撮影してください。レンズとフラッシュの組み合わせに
よっては、レンズがフラッシュ光を妨げ、写真の下部に影ができる
ことがあります。
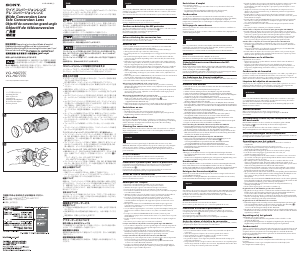
各部のなまえ
1
…フォーカスリング
2
…距離目盛
3
…無段階絞りポジション
4
…レンズ信号接点
5
…マウント標点
6
…
A
ポジション
7
…絞りリング
8
…距離指標
9
…被写界深度目盛
レンズの取り付けかた/取りはずしかた
取り付けかた
(
イラスト
–
参照
)
1
レンズの前後レンズキャップとカメラのボディキャップ
をはずす。
レンズフロントキャップは図の
(1)
、
(2)
の
2
通りの方法で取り付け/
取りはずしができます。
(2)
は、レンズフードを付けた状態でのレン
ズキャップの取り付け/取りはずしに便利です。
2
レンズとカメラのオレンジの点(マウント標点)を合わせ
てはめ込み、レンズを軽くカメラに押し当てながら、時計
方向に「カチッ」とロックがかかるまでゆっくり回す。
レンズを取り付けるときは、カメラのレンズ取りはずしボタンを押
さないでください。
レンズを斜めに差し込まないでください。
取りはずしかた
(
イラスト
–
参照
)
カメラのレンズ取りはずしボタンを押したまま、レンズを反
時計方向に回してはずす。
レンズフードを取り付ける
画面外にある光が描写に影響するのを防ぐために、レンズフード
の使用をおすすめします。
レンズフードの取り付け部の形状とレンズの先端の形状を合
わせ、時計方向に回す。
撮影後レンズフードを収納するときは、逆向きにレンズに取り付けてく
ださい。
ピントを合わせる
このレンズはマニュアルフォーカス専用です。
被写体が最もはっきり見えるように、フォーカスリングを左
右に回す。
カメラがオートフォーカス設定になっていても、このレンズはマニュア
ルフォーカスにてご使用になれます。
ファインダー等のフォーカス表示は作動しません。
アポダイゼーションについて
このレンズでは、「アポダイゼーション光学エレメント」という特殊効果エレメントを、レンズ光学系の
中の絞りの近くに配置しています。これは周辺に行くにしたがって透過光量が落ちる特殊光学エレメ
ントで、周辺に行くにしたがって濃度が高くなる
1
種の
ND
フィルターと考えることができます。この
レンズの絞り値は、アポダイゼーション光学エレメントの減光量を考慮に入れた
T No.
によって、表示
/コントロールされます。
T No.
は、露出を決める上では普通のレンズの
F No.
と同様にお使いいただ
けます。
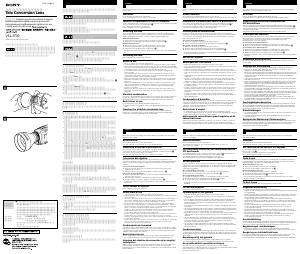
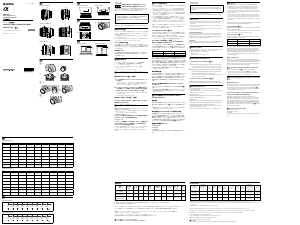
ボケ味改良の原理
点像のボケかた 線のボケかた
本レンズ
周辺に行くほどなだらかに
強度が弱くなる
形を失わずになだらかに広がる
収差を良好に
補正したレンズ
強度が均一で広がりがある
線が太る
ボケ像は点像の集まりによって表現されます。収差が良好に補正されたレンズでは、像の形は正確に再現されますが、なめらかなボケ
具合は失われてしまいます。補正のされかたによっては、
2
線ボケなど汚いボケになることもあります。アポダイゼーション光学エ
レメントを採用したこのレンズでは、周辺に行くほど強度が落ちるため、芯があってなめらかに広がりのある描写、すなわち元の形が不
自然に変形することのない、柔らかく自然なボケ味を表現することができます。
アポダイゼーション
光学エレメント
アポダイゼーション
光学エレメント
絞りについて
このレンズは、絞りリングで無段階設定できる独自の無段階絞り
(イラスト
-
*1)
と、他のレンズと同じようにカメラ側で絞り
を設定する
A
ポジション用の自動絞り(イラスト
-
*2
)の
2
系
統の絞り機構があります。絞りリングで切り替えて使用できます。
無段階絞りは特に絞りの形状にこだわっており、自動絞りよりさ
らに真の円形に近いボケが得られます。開放付近の絞りで撮影さ
れる場合は、こちらの使用をおすすめします。
無段階絞りポジションでの使いかた
(
イラスト
–
参
照
)
開放付近(
T4.5
〜
6.7
)で無段階に絞り設定を行なうことができま
す。レンズの絞りリングを回して、希望の絞り値を設定してくだ
さい。
カメラの露出モードは、
A
または
M
モードをおすすめします(
P
モードお
よびシーンセレクション設定時は
A
モードと同様となり、
S
モード時は
M
モードと同様になります)。
4.5
、
5.6
、
6.7
の位置ではクリックがあります。その間の絞りも設定可能
です。
4.5
と
5.6
の間にある指標は、絞り段数で
3
等分した位置にあります。
無段階絞りでは他のレンズとは異なり、絞り込み測光となります。
実際の撮影では絞りリングで設定された絞り値が使われますが、カメラ
の表示や記録には、その値は正確には反映されません。
A
ポジションでの使いかた
絞りリングを
A
の位置(
A
ポジション)にします。絞り値はカメラ
で設定してください。
カメラの露出モードはそのまま使えます。
*3.
無段階絞りポジション
*4.A
ポジション
被写界深度(単位:m)
レンズはある距離にピントを合わせたとき、その距離にあるもの
が鮮鋭に写るだけでなく、その前後にも写真として実用上ピント
が合って写る範囲があります。この範囲を被写界深度といいます。
被写界深度は使用レンズの撮影距離、絞りによって変化します。
被写界深度は、被写界深度目盛上で該当する絞りによって表示さ
れます。
被写界深度目盛と被写界深度表は
35mm
判カメラ用です。
APS-C
サイズ相当の撮像素子を搭載したレンズ交換式デジタルカメラで
は、被写界深度は浅くなります。
露出補正
近距離撮影でレンズの明るさが暗くなります。カメラの
AUTO
モードなどの自動露出撮影やメータードマニュアル撮影の場合は
露出が自動補正されますので、そのまま撮影できます。市販の露
出計を使用する場合は、+側に露出補正を行ってください。露出
補正量はテスト撮影されることをおすすめします。
(例:絞りで補正する場合、+
1
は絞りを
1
段階開放側に補正しま
す。)
露出補正段数
撮影倍率
撮影距離
+1
0.25X 0.20X 0.15X 0.08X 0.029X
0.87 1.0 1.2 2.0 5.0
m
0+
3
/
4
+
1
/
2
+
1
/
4
主な仕様
商品名
(
型名
)
135mm F2.8 [T4.5] STF (SAL135F28)
35mm
判換算焦点距離
*
1
(mm) 202.5
レンズ群一枚
6-8*
2
画角
1*
3
18
゚
画角
2*
3
12
゚
最短撮影距離
*
4
(m) 0.87
最大撮影倍率
(
倍
) 0.25
最小絞り
F31(T32)
フィルター径
(mm) 72
外形寸法(最大径×長さ)
(mm)
約
80
×
99
質量
(g)
約
730
*
1
ここでの
35mm
判換算焦点距離とは、
APS-C
サイズ相当の撮像素子を
搭載したレンズ交換式デジタルカメラでの値を表します。
*
2
アポダイゼーション光学エレメント1群2枚を含む。
*
3
画角
1
は
35mm
判カメラ、画角
2
は
APS-C
サイズ相当の撮像素子を搭載し
たレンズ交換式デジタルカメラの値を表します。
*
4
撮像素子面から被写体までの距離を表します。
同梱物:レンズ
(1)
、レンズフロントキャップ
(1)
、レンズリヤキャッ
プ
(1)
、レンズフード
(1)
、レンズケース
(1)
、印刷物一式
仕様および外観は、改良のため予告なく変更することがあります
が、ご了承ください。
はソニー株式会社の商標です。
English
You will find information on using each lens in this manual. Precautions
common to lenses, such as notes on use will be found in “Precautions
before using” on a separate sheet. Be sure to read both documents before
using the lens.
This lens is a manual focus lens with a highly developed defocusing design.
A special apodization element gives defocused areas a smooth and attractive
appearance. This lens is equipped with the aperture ring that enables a
stepless aperture setting between F No.2.8-5.7 (T No.4.5-6.7*), and makes the
most of the defocusing effect in the foreground and background areas. Enjoy
this unique image-expression, which cannot be duplicated on traditional
lenses.
* T No. (T-Numbers) : the T No. is a practical value that indicates how much
light is in the lens, allowing for the lens’s transmission rate. Although this
lens’s wide-open aperture is f/2.8, the special apodization system provides the
light amount of T/4.5, which is the same as that of f/4.5 on a normal lens. The
aperture value on the lens, the value indicated on a camera, and the value used
when determining the exposure are all indicated by T No. Use the T No. as a
normal aperture value.
This lens is designed for A-mount, which can be used on Sony α cameras.
Notes on use
When using this lens with an E-mount camera, attach a separately sold Mount
Adaptor. Do not attach the lens directly to the E-mount camera or you may
damage both.
When you carry the camera with the lens attached, make sure to hold both the
camera and the lens steadily.
Do not hold the camera by the lens part extended for focusing.
Precautions for flash use
When using a built-in camera flash, make sure to remove the lens hood and
shoot from at least 1 m (3.3 feet) away from your subject. With certain of
lens/flash combinations, the lens may partially block the light of the flash,
resulting in a shadow at the bottom of the picture.
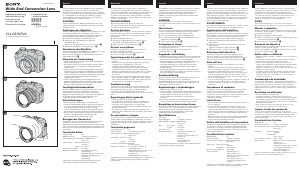
Names of parts
1···Focusing ring 2···Distance scale 3···Stepless aperture range
4···Lens contacts 5···Mounting index 6···A position 7···Aperture ring
8···Distance index 9···Depth-of-field scale
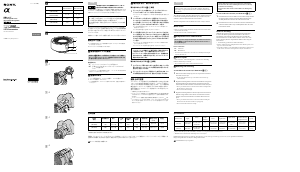
Attaching/detaching the lens
To attach the lens (See illustration
–
.)
1
Remove the rear and front lens caps and the camera body cap.
You can attach/detach the lens front cap in two ways, (1) and (2). When
you attach/detach the lens cap with the lens hood attached, use method (2).
2
Align the orange index on the lens barrel with the orange index
on the camera (mounting index), then insert the lens into the
camera mount and rotate it clockwise until it locks.
Do not press the lens release button on the camera when mounting the lens.
Do not mount the lens at an angle.
To remove the lens (See illustration
–
.)
While pressing and holding the lens release button on the camera,
rotate the lens counterclockwise until it stops, then detach the lens.
Attaching lens hood
It is recommended that you use a lens hood to reduce flare and ensure
maximum image quality.
Fit the hood into the mount on the end of the lens barrel and rotate
the hood clockwise.
When storing, turn over the lens hood and place it onto the lens backwards.
Focusing
This lens is a manual-focus lens.
Turn the focusing ring until the image appears sharp.
This lens can be used in manual-focus mode, even if your camera is set to
autofocus mode.
The focus signal found in the viewfinder, etc., does not work.
SAL135F28
135mm F2.8 [T4.5] STF
取扱説明書
/
Operating Instructions/Mode d'emploi/Manual de
instrucciones/
交換レンズ
/
Interchangeable Lens/
Objectif interchangeable/
A-mount
4-271-845-04(1)
©2006 Sony Corporation
Printed in Japan
Aperture
This lens has two aperture control systems: stepless aperture, which provides
stepless aperture ring (- *1) adjustment, and automatic aperture (A
position) for traditional manual-focus lens (- *2) adjustment on the
camera. Use the aperture ring to switch between the two systems. Stepless
aperture places emphasis on the aperture shape, and provides a rounder
defocused area than that of an image taken with automatic aperture. Stepless
aperture is recommended for large aperture settings.
To use the stepless aperture setting (See illustration
–
.)
This setting allows stepless control of the aperture between T/4.5 - T/6.7.
Turn the aperture ring to set the desired aperture.
Set your camera to A mode or M mode when using this setting. (In P mode or
scene-selection setting, the settings will be the same as A mode. In S mode, the
settings will be the same as M mode.)
A slight click can be felt at the T/4.5, T/5.6, and T/6.7 marks.
The index marks between T/4.5 and T/5.6 represent 1/3 aperture values.
Stop-down metering is used when the stepless aperture is selected.
When shooting, the aperture values set by the aperture ring are used. Those
values are not accurately reflected in the values displayed or recorded by the
camera.
To use the A position
Set the aperture ring to the A position (position indicated by A). Set the
aperture on your camera.
All exposure modes (P, A, S, M) can be used on the camera.
*3.Stepless aperture range *4.A position
Depth of field (in meters)
When focus is set on a subject, anything at that same distance will appear
sharp, and anything within a certain range before and beyond the subject will
also appear in focus; this is called depth of field. Depth of field depends on
the subject distance and aperture you choose and is indicated by the lines on
the depth-of-field scale corresponding to the aperture.
The depth-of-field scale and depth-of-field table are for 35mm-format
cameras. The depth of field is shallower when you use Interchangeable Lens
Digital Cameras equipped with an APS-C sized image sensor.
Exposure compensation
The brightness of the lens decreases with macro shooting. This is
automatically compensated for in all auto-exposure modes, or in metered
manual mode. If your camera is set to the manual exposure mode and
you are using a commercially-available exposure meter, set plus exposure
compensation. Test shooting is recommended to determine the appropriate
degree of compensation.
(E.g., when adjusting by the aperture, +1 means opening the aperture 1 more
stop.)
Exposure
correction
Magnification
ratios
Distance
+1
0.25X 0.20X 0.15X 0.08X 0.029X
0.87 1.0 1.2 2.0 5.0
m
0+
3
/
4
+
1
/
2
+
1
/
4
Specifications
Name (Model name)
135mm F2.8 [T4.5] STF
(SAL135F28)
Equivalent 35mm-format focal length*
1
(mm)
202.5
Lens groups-elements 6-8*
2
Angle of view 1*
3
18°
Angle of view 2*
3
12°
Minimum focus*
4
(m (feet))
0.87 (2.85)
Maximum magnification (×)
0.25
Minimum f-stop
f/31 (T/32)
Filter diameter (mm)
72
Dimensions (maximum diameter × height)
(mm (in.))
Approx. 80×99 (3 1/8×3 7/8)
Mass (g (oz.))
Approx. 730 (25 3/4)
*
1
The value for the equivalent 35mm-format focal length is based on
Interchangeable Lens Digital Cameras equipped with an APS-C sized image
sensor.
*
2
Including apodization element (1-2)
*
3
The value of angle of view 1 is based on 35mm-format cameras, and that of
angle of view 2 is based on Interchangeable Lens Digital Cameras equipped
with an APS-C sized image sensor.
*
4
Minimum focus is the distance from the image sensor to the subject.
Included items: Lens (1), Lens front cap (1), Lens rear cap (1), Lens hood (1),
Lens case (1), Set of printed documentation
Designs and specifications are subject to change without notice.
is a trademark of Sony Corporation.
–1
(1) (2)
–2
*3
*4
*2
*1
About Apodization
A special “apodization element” is situated near the aperture of the lens optical system. This special optical element is a
type of ND filter which gradually becomes thicker (darker) towards the perimeter, thereby reducing the amount of light
that passes through around the outer perimeter. The aperture of this lens is indicated and controlled by the T No., which
compensates for the reduction imposed by the special apodization element. The T No. can be used as the F No. on a
normal lens when the exposure is determined.
Principle of defocusing effect improvement
Defocusing of a dot Defocusing of a line
This lens
Intensity decreases gradually
toward the perimeter
Gradually diffused without losing shape
Theoretical ideal
traditional lens
Intensity stays the same
Line becomes thicker
Defocused images appear as blurred clusters of dots. A lens with well compensated aberration reproduces the image shape accurately, but cannot produce
smooth blurs in a defocused area. There may be unpleasant blurs, which for example, make one line appear to be doubled, depending on the way of
compensation. This lens adopts a special apodization element that provides a gradually diffused image toward the perimeter without losing the core shape. In
other words, it provides soft and natural defocusing without transforming the original shape unnaturally.
Apodization elementApodization element
被写界深度表(単位:
m
)
/Depth-of-field table (in meters)/Tableau de profondeur de champ (en
mètres)/Tabla de profundidad de campo (en metros)/
T/4.5 T/5.6 T/6.7 T/8 T/11 T/16 T/22 T/32
-114.8
-97.8
-82.3
-69.2
-49.0
-34.7
-24.6
-17.4
10m
10.91-9.23 11.08-9.11 11.32-8.96 11.61-8.79 12.44-8.37 13.84-7.84 16.48-7.20 22.58-6.46
5m
5.21-4.81 5.24-4.78 5.29-4.74 5.35-4.69 5.51-4.58 5.76-4.42 6.15-4.22 6.80-3.97
3m
3.068-2.935 3.080-2.924 3.096-2.910 3.115-2.894 3.165-2.852 3.239-2.795 3.350-2.719 3.522-2.618
2m
2.027-1.974 2.032-1.969 2.038-1.963 2.046-1.956 2.065-1.939 2.094-1.915 2.135-1.882 2.198-1.837
1.5m
1.514-1.478 1.156-1.484 1.519-1.481 1.523-1.478 1.533-1.469 1.547-1.456 1.567-1.439 1.597-1.415
1.2m
1.028-1.192 1.209-1.191 1.211-1.189 1.213-1.187 1.219-1.182 1.226-1.175 1.238-1.165 1.254-1.151
1.0m
1.005-0.995 1.006-0.994 1.007-0.993 1.008-0.992 1.011-0.989 1.016-0.985 1.023-0.978 1.033-0.970
0.87m
0.873-0.867 0.874-0.866 0.874-0.866 0.875-0.865 0.877-0.863 0.881-0.860 0.885-0.856 0.891-0.850


この商品に関する会話に参加する
ここでは、ソニー SAL135F28 カメラレンズ についての意見を共有できます。 疑問がある場合は、まず説明書をよく読んでください。 マニュアルのご請求は、お問い合わせフォームより承ります。