
日本語
電気製品は、安全のための注意事項を守らないと、人身への
危害や火災などの財産への損害を与えることがあります。
この取扱説明書には、事故を防ぐための重要な注意事項と製品の取り扱いかたを
示しています。この取扱説明書をよくお読みの上、製品を安全にお使いください。
お読みになったあとは、いつでも見られる所に必ず保管してください。
この「取扱説明書」ではレンズごとの使いかたを説明していま
す。使用上のご注意など、レンズに共通したご注意や説明につ
いては別冊の「使用前のご注意」でご覧頂けます。
必ずご使用の前に、本書と合わせてよくお読みのうえでご使用
ください。
本機はソニー製αマウントカメラ(
APS
-
C
サイズ相当の撮像素子
搭載機種)専用のレンズです。
35mm
判カメラではお使いになれ
ません。
使用上のご注意
E
マウントカメラでお使いの場合は、別売のマウントアダプターをご使用
ください。破損のおそれがありますので、レンズを
E
マウントカメラに直
接取り付けないでください。
レンズを取り付けてカメラを持ち運ぶときは、カメラとレンズの両方を
しっかり持ってください。
ズームやピント合わせなどにより繰り出されたレンズ部分でカメラを保
持しないでください。
フラッシュ使用時のご注意
レンズとフラッシュの組み合わせによっては、レンズがフラッ
シュ光を妨げ、写
真の下部に影ができることがあります。カメラ
内蔵フラッシュ使用時には、レンズフードをはずし、
1
m以上離れ
て撮影してください。
周辺光量について
レンズは原理的に画面周辺部の光量が中心部に比べ低下します。
周辺光量の低下が気になる場合は、開放絞りから1〜
2
段絞り込
んでご使用ください。
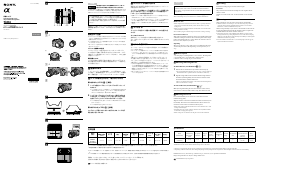
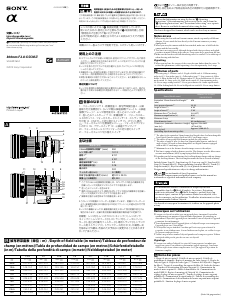
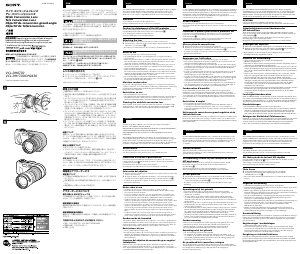
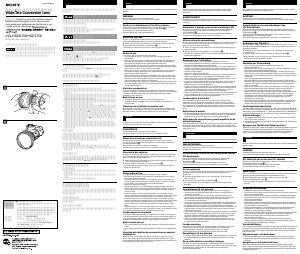
各部のなまえ
1
…ズームリング
2
…焦点距離指標
3
…レンズ信号接点
4
…マウ
ント標点
5
…焦点距離目盛
6
…ズームロックスイッチ
7
…距離指
標
8
…距離目盛
9
…フォーカスリング
10
…レンズフード指標
レンズの取り付けかた/取りはずしかた
取り付けかた(イラスト‒参照)
1
レンズの前後レンズキャップとカメラのボディキャップ
をはずす。
レンズの前レンズキャップは図の(
1
)、(
2
)の
2
通りの方法で取り付け
/取りはずしができます。(
2
)は、レンズフードを付けた状態でのレ
ンズキャップの取り付け/取りはずしに便利です。
2
レンズとカメラのオレンジの点(マウント標点)を合わせ
てはめ込み、レンズを軽くカメラに押し当てながら、時計
方向に「カチッ」とロックがかかるまでゆっくり回す。
レンズを取り付けるときは、カメラのレンズ取りはずしボタンを押
さないでください。
レンズを斜めに差し込まないでください。
取りはずしかた(イラスト‒参照)
カメラのレンズ取りはずしボタンを押したまま、レンズを反
時計方向に回してはずす。
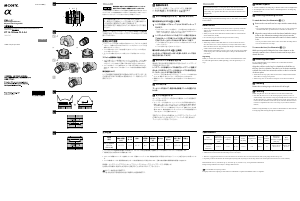
主な仕様
商品名
(型名)
35mm
判
換算焦点距離
*
1
(mm)
レンズ
群一枚
画角
*
1
最短
撮影距離
*
2
(m)
最大撮影倍率
(
倍
)
最小絞り
フィルター径
(mm)
外形寸法(最
大径×長さ)
(mm)
質量
(g)
DT 18-
250mm
F3.5-6.3
(SAL18250)
27
-
375 13
-
16 76
゚-
6
゚
30
0
.
45 0
.
29 F22
-
40 62
約
75
×
86
約
440
*
1
ここでの
35mm
判換算焦点距離および画角とは、
APS
-
C
サイズ相当の撮像素子を搭載したデジタル一眼レフカメラでの値を表します。
*
2
最短撮影距離とは、撮像素子面から被写体までの最短距離を表します。
このレンズは距離エンコーダーを搭載しています。距離エンコーダーとは、
高精度な調光(
ADI
調光)を
ADI
対応フラッシュとの組み合わせで実現する機能で
す。
レンズの機構によっては、撮影距離の変化に伴って焦点距離が変化する場合があります。記載の焦点距離は撮影距離が無限遠での定義です。
同梱物:レンズ(
1
)、前レンズキャップ(
1
)、後レンズキャップ(
1
)、レンズフード(
1
)、印刷物一式
仕様および外観は、改良のため予告なく変更することがありますが、ご了承ください。
はソニー株式会社の商標です。
English
You will nd information on using each lens in this manual. Precautions
common to lenses, such as notes on use will be found in “Precautions
before using” on a separate sheet. Be sure to read both documents before
using the lens.
is lens is designed for Sony α mount cameras (models equipped with
APS-C sized image sensor). You cannot use on 35mm-format cameras.
Notes on use
When using this lens with an E-mount camera, attach a separately sold Mount
Adaptor. Do not attach the lens directly to the E-mount camera or you may
damage both.
When you carry the camera with the lens attached, make sure to hold both the
camera and the lens steadily.
Do not hold by any part of the lens that protrudes when zooming or focusing.
Precautions for ash use
With certain of lens/ash combinations, the lens may partially block the light
of the ash, resulting in a shadow at the bottom of the picture. When using a
built-in camera ash, make sure to remove the lens hood and shoot from at
least 1m (3.3 feet) away from your subject.
Vignetting
When you use lens, the corners of the screen become darker than the center.
To reduce this phenomena (called vignetting), close the aperture by 1 to 2
stops.
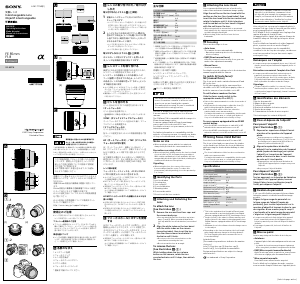
Names of parts
1···Zooming ring 2···Focal-length index 3···Lens contacts 4···Mounting index
5···Focal-length scale 6···Zoom lock switch 7···Distance index
8···Distance scale 9···Focusing ring 10···Lens hood index
Attaching/detaching the lens
To attach the lens (See illustration
–
.)
1
Remove the rear and front lens caps and the camera body cap.
You can attach/detach the front lens cap in two ways, (1) and (2). When you
attach/detach the lens cap with the lens hood attached, use method (2).
2
Align the orange index on the lens barrel with the orange index on
the camera (mounting index), then insert the lens into the camera
mount and rotate it clockwise until it locks.
Do not press the lens release button on the camera when mounting the lens.
Do not mount the lens at an angle.
To remove the lens (See illustration
–
.)
While pressing and holding the lens release button on the camera,
rotate the lens counterclockwise until it stops, then detach the lens.
Attaching lens hood
It is recommended that you use a lens hood to reduce are and ensure
maximum image quality.
Align the red line on the lens hood with the red line on the lens (Lens
hood index). Turn the hood clockwise until the red line on the lens
meets the red dot on the hood and it clicks into place.
When using a built-in camera ash, make sure to remove the lens hood to avoid
blockage of the ash light.
Attach the lens hood properly. Otherwise, the lens hood may interfere with the
desired eect or may appear in pictures.
When storing, turn over the lens hood and place it onto the lens backwards.
Zooming
Rotate the zooming ring to the desired focal length.
Zoom lock
is prevents the lens barrel from extending due to the weight of the lens
while it is carried.
Slide the zoom lock switch to lock. To unlock, slide the zoom lock switch
back.
Focusing
When using the auto focus, the camera focuses the lens automatically.
While the camera is auto focusing, do not touch the focusing ring as it rotates.
Only rotate the focusing ring manually when the camera is set to the direct
manual focus, otherwise a malfunction may result.
When focusing manually, set your camera to the manual focus and rotate the
focusing ring while looking through the viewnder. e focus signal in the
viewnder indicates the current condition of the focus.
e focusing ring can be rotated slightly past the innity to provide accurate
focusing under various operating temperatures. Do not rotate the focusing ring
all the way to the end when focusing manually, even at innity. Look through the
viewnder and set the focus precisely.
For Lens model DT 18-250mm F3.5-6.3, the focusing ring rotates the opposite
way than standard A-mount lenses.
Specications
Name
(Model name)
Equivalent
35mm-format
focal length*
1
(mm)
Lens groups-
elements
Angle of
view*
1
Minimum
focus*
2
(m (feet))
Maximum
magnication
(X)
Minimum
f-stop
Filter diameter
(mm)
Dimensions
(maximum diameter
× height)
(mm (in.))
Mass
(g (oz.))
DT 18-250mm F3.5-6.3
(SAL18250)
27-375 13-16 76°-6°30’ 0.45(1.48) 0.29 f/22-40 62
Approx. 75×86
(3×3 3/8)
Approx. 440
(15 4/8)
*
1
e values for equivalent 35mm-format focal length and angle of view are based on Digital Single Lens Reex Cameras equipped with an APS-C sized image sensor.
*
2
Minimum focus is the shortest distance from the image sensor to the subject.
is lens is equipped with a distance encoder. e distance encoder allows more accurate measurement (ADI) by using a ash for ADI.
Depending on the lens mechanism, the focal length may change with any change of the shooting distance. e focal length assumes the lens is focused at innity.
Included items: Lens (1), Front lens cap (1), Rear lens cap (1), Lens hood (1), Set of printed documentation
Designs and specications are subject to change without notice.
is a trademark of Sony Corporation.
–1
(1) (2)
–2
4-424-144-01(1)
©2012 Sony Corporation
SAL18250
交換レンズ/
Interchangeable Lens/
Objectif interchangeable/
DT 18-250mm F3.5-6.3
取扱説明書
/
Operating Instructions/Mode d'emploi/Manual de
instrucciones/
Printed in China
A-mount
レンズフードを取り付ける
画面外にある光が描写に影響するのを防ぐために、レンズフード
の使用をおすすめします。
レンズフードの赤線をレンズの赤線(レンズフード指標)に合
わせ、そのままレンズフードの赤点とレンズの赤線が合い、
「カチッ」というまで時計方向に回す。
内蔵フラッシュを使って撮影するときは、フラッシュ光が遮られること
がありますので、レンズフードをはずしてください。
レンズフードは正確に取り付けてください。レンズフードの効果が出な
かったり、画面の一部にレンズフードが写り込むことがあります。
撮影後レンズフードを収納するときは、逆向きにレンズに取り付けてく
ださい。
ズームする
ズームリングを回して、希望の焦点距離(ズームの位置)に合
わせる。
ズームロックについて
携帯時など、レンズの自重による鏡筒の伸長を防ぎます。
スイッチをスライドさせロックします。解除するにはスイッチを
戻します。
ピントを合わせる
オートフォーカスでピントを合わせる場合は、カメラが自動的に
ピントを合わせます。
オートフォーカス作動中は、フォーカスリングが回転しますので触れな
いでください。また、ダイレクトマニュアルフォーカス時以外にフォー
カスリングを無理に操作すると、故障の原因になりますのでご注意くだ
さい。
手動でピントを合わせる場合は、カメラをマニュアルフォーカ
ス(手動によるピント合わせ)にして、ファインダーをのぞいて
フォーカスリングを回してください。ファインダー内のフォーカ
ス表示がピントの状態をお知らせします。
さまざまな温度条件下でも良好なピントが確保できるよう、フォーカス
リングは無限遠側に余分に回転する仕組みになっています。手動でピン
ト合わせをする場合は、無限遠撮影時でもフォーカスリングを無限遠の
終端まで(止まるまで)回さず、ファインダーを見ながら正確にピント合
わせをしてください。
DT 18
-
250mm F3
.
5
-
6
.
3
は、フォーカスリングを回す方向が通常の
A
マウ
ントレンズと反対です。



この商品に関する会話に参加する
ここでは、ソニー SAL18250 カメラレンズ についての意見を共有できます。 疑問がある場合は、まず説明書をよく読んでください。 マニュアルのご請求は、お問い合わせフォームより承ります。