(English) Concept 1
User Manual
(Español)
Concept 1
Manual de usuario
(Deutsch) Concept 1
Benutzerhandbuch
(Francais)
Concept 1
Manuel utilisateur
Features
• Ultra-highoutputinasmallsizeashlight
• Utilizes a CREE XHP35 HD E2 LED with a max output of up to 1800 lumens
• Max beam intensity of up to 12,100cd and max distance of up to 220 meters
• CrystalCoatingTechnologycombinedwith“PrecisionDigitalOpticsTechnology”forextremereectorperformance
• Max runtime of up to 300 hours
• Side switch controls 5 brightness levels and 3 special modes
• With integrated power circuit, the Concept 1 blinks to indicate remaining battery power and reports battery voltage to the
nearest ±0.1V
• Features intelligent memory function (except for SOS and location beacon modes)
• Highecientconstantcurrentcircuitboardprovidesconstantillumination
• The built-in ATR module automatically regulates its output and adapts to the ambient environment to maintain optimal
performance
• Reverse polarity protection
• Toughenedultra-clearmineralglasswithanti-reectivecoating
• Magnetic tail cap with stand capability
• ConstructedfromaerogradealuminumalloywithHAIIImilitarygradehard-anodizednish
• Waterproof in accordance to IPX8 (two meters submersible)
• Impact resistant to 1 meter
Dimensions Accessories
Length: 111.5mm (4.39”) Holster, clip, lanyard, spare O ring
Head Diameter: 24.5mm (0.96”)
Tail Diameter: 23.8mm (0.94”)
Weight: 61.9g (2.18oz) (without battery)
Battery options
Type Nominal voltage Compatible
NITECORE NL1835HP (3500mAh) 18650 3.6V Yes (Recommended)
Rechargeable IMR18650 Li-ion Battery IMR 18650 3.6V Yes (Recommended)
18650 Rechargeable Li-ion battery (output current higher than 8A) 18650 3.7V Yes
Primary Lithium battery CR123 3V Yes
Rechargeable Li-ion battery RCR123 3.7V Yes
Output & Runtime
FL1 STANDRAD
Turbo High Mid Low Ultralow Strobe SOS Beacon
1800LUMENS 810LUMENS 300LUMENS 80LUMENS 1LUMEN 1800LUMENS 1800LUMENS 1800LUMENS
*30min *1h30min 4h 15h 300h
— — —
220 meters 153 meters 84 meters 40 meters 5 meters
— — —
12,100 cd 5,850 cd 1,780 cd 400 cd 6.5 cd
— — —
1 meter (Impact Resistance)
IPX8, 2 meters (waterproof and submersible)
NOTE: TheabovedatahasbeenmeasuredinaccordancewiththeinternationalashlighttestingstandardsANSI/NEMAFL1,
using1xIMR18650battery(3.6V,3100mAh)underlaboratoryconditions.Thedatamayvaryinreal-worlduseduetodierent
battery use or environmental conditions.
* The runtime for Turbo mode and High mode are the testing result before starting temperature regulation.
* The Turbo 1800 lumens requires the use of rechargeable IMR18650 or 18650 Li-ion batteries with output current higher than
8A.Ifuse18650Li-ionbatterieswithoutputcurrentlowerthan8A,theTurboisnotaccessibleortheConcept1willturno
suddenly. And the Turbo is not accessible with CR123A or RCR123A batteries.
Operating Instructions
Battery Installation
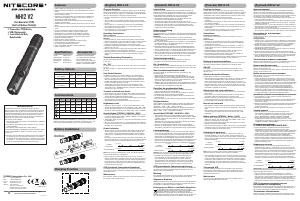
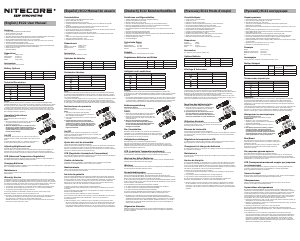
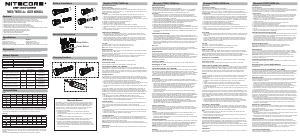
Insert battery as illustrated in the diagram. Upon battery installation, the light blinks
to report battery voltage (refer to the Power Tip section for details) and enters the
Standby status.
Warning
1. Ensure battery is inserted with the positive (+) end pointing to the head of the
light. The light will not operate with incorrectly inserted batteries.
2. When using Turbo mode, the head of Concept 1 will get hot. It is not
recommended to use Turbo mode for a long time in case of scalding.
3. CAUTION! Possible dangerous radiation! Don't look into the light! Maybe dangerous
for your eyes.
4. If the power tip reports the voltage level of the battery is low, stop using the light
and take out the battery to charge.
5.Donotsubmergetheproductinwateroranyliquidwhenithasgeneratedsucientheat,doingsowillcausepressure
inequalitiesandsignicantlyincreaseriskofwaterdamages.
Mode Selection
The Concept 1 has two operating modes:
●GeneralMode:oersdirectaccesstotheTurbobrightnessfromStandby
●TacticalMode:oersdirectaccesstotheStrobefromStandby
ToswitchbetweentheGeneralmodeandtheTacticalmode,followingthestepsbelow:
1.Turnothelight.Loosenthetailcapforhalfaturn.
2. Tighten the tail cap while pressing and holding down the side switch simultaneously.
3.Thelightwillblinktoindicatewhichmodehasbeenselected.AsingleblinkindicatesGeneralMode,andtwoblinksindicate
Tactical Mode.
On/O Operation
Standby Status
Upon battery installation, the Concept 1 will enter standby status.
NOTE: When the product is placed in a backpack or stored for a long time, please loosen the tailcap to avoid accidental
activation.
Turn on
When the light is in the standby status:
1. Press and hold down the side switch until the light is turned on to the memorized brightness
2. Tap the side switch twice quickly to activate the ultra-low brightness
3.TapthesideswitchthreetimesquicklytoenterTurboinGeneralmodeorenterStrobeinTacticalmode
Turn o
Withthelighton,tapthesideswitchoncetoturnitoandgobacktothestandbystatus.
Quick Access to Turbo:
In any illumination mode, press and hold down the side switch to enter the Turbo. Simply release to revert to the memorized
brightness.
Brightness Selection
5 brightness levels are available. When the light is in standby status, hold down the side switch until the light enters the
memorized brightness level from last time. Continue to hold down the switch to cycle through “Ultralow-low-mid-high-turbo”.
Release the switch to select and memorize the current brightness level. To reselect brightness level, tap the switch once to turn
othelightandholddowntheswitchtocyclethrough5brightnesslevels.
Special Mode (Strobe/SOS/Beacon)
To enter the strobe mode:
1. When in standby status of tactical mode, quickly tap the switch 3 times
2. When in any illumination status, quickly tap the switch 3 times
In the strobe mode, hold the switch for over 1 second to enter SOS mode; and then release and hold the switch for over 1
second to enter beacon mode. By the same operation to cycle through “strobe-SOS-beacon”. To exit the special modes, simply
taptheswitchoncetoturnothelightandenterstandby.
ATR(Advanced Temperature Regulation)
With Advanced Temperature Regulation module, the Concept 1 regulates its output and adapts to the ambient environment,
maintaining optimal performance.
Note: When the Concept 1 is overheated, the turbo cannot be turned on.
Power Tips
Whenpoweriso,everytimethebatteryisinserted,thelightwillreportbatteryvoltage(tothenearest±0.1V)(during
reporting battery voltage, tap the switch to stop it). For example, when the battery voltage is at a maximum charge of 4.2V ,
the power indicator will blink 4 times, followed by 1.5 seconds pause and 2 more blinks before entering the standby status.
Dierentvoltagesrepresentthecorrespondingremainingbatterypowerlevels:
1×18650 battery
2×CR123 batteries
Note: whenusingtwoCR123/RCR123inseries,theashlightonlyreportstheaveragevoltageofthetwobatteries.
Changing Batteries
Batteriesshouldberechargedorreplacedifanyofthefollowingsoccurs:outputappearstobedimortheashlightbecomes
unresponsive.
Maintenance
Every 6 months, threads should be wiped with a clean cloth followed by a thin coating of silicon-based lubricant.
Warranty Service
All NITECORE
®
productsarewarrantedforquality.DOA/defectiveproductscanbeexchangedforreplacementthrougha
localdistributor/dealerwithinthe15daysofpurchase.After15days,alldefective/malfunctioningNITECORE
®
products will
be repaired free of charge for a period of 60 months from the date of purchase. After 60 months, a limited warranty applies,
covering the cost of labor and maintenance, but not the cost of accessories or replacement parts.
Thewarrantyisnulliedinallofthefollowingsituations:
1.Theproduct(s)is/arebrokendown,reconstructedand/ormodiedbyunauthorizedparties.
2.Theproduct(s)is/aredamagedthroughimproperuse.
3.Theproduct(s)is/aredamagedbyleakageofbatteries.
For the latest information on NITECORE
®
products and services, please contact your national NITECORE
®
distributor or send an
※TheNitecoreocialwebsiteshallprevailincaseofanyproductdatachanges.
+ IMR 18650 -
Battery
CR123
Battery
CR123
+ -
+ -
OR
3.5V 3.7V 3.9V 4.2V
Low power Full power
Eigenschaften
• Besonders hohe Ausgangsleistung in einer kleinen Taschenlampe
• Verwendet eine CREE XHP35 HD E2 LED mit einer maximalen Leistung von bis zu 1800 Lumen
• Maximale Spotintensität von bis zu 12100 cd und max. Leuchtweite bis zu 220 Meter
• CrystalCoatingTechnologiekombiniertmit"PrecisionDigitalOpticsTechnologie"fürextremeReektorleistung
• Maximale Leuchtzeit von bis zu 300 Stunden
• Seitenschalter steuert 5 Helligkeitsstufen und 3 Sondermodi
• Integrierte Leistungsanzeige. Die Concept 1 zeigt durch Blinken die verbleibende Batterieleistung sowie die Batteriespannung
an (auf ± 0,1V genau)
• Intelligente Speicherfunktion (außer SOS- und Location-Beacon-Mode)
• HochezienteRegelelektroniksorgtfüreinekonstanteLeistung
• Das eingebaute ATR-Modul regelt automatisch die Ausgangsleistung in Abhängigkeit von der Umgebungstemperatur, um eine
optimale Funktion zu gewährleisten
• Verpolungsschutz
• Gehärtetes,ultra-klaresMineralglasmitAntireexbeschichtung
• Magnetische Heck-Kappe mit Kerzenstandfähigkeit
• Aus Luftfahrt-Aluminium-Legierung. Hart eloxiert nach Militär Standard HA III
• Wasserdicht nach IPX8 (zwei Meter tauchfähig)
• bruchfeste Fallhöhe bis 1 Meter
Maße Zubehör
Länge: 111,5 mm Holster, Clip, Handschlaufe, Ersatz Dichtring
Kopfdurchmesser: 24,5 mm
Gehäusedurchmesser: 23,8mm
Gewicht: 61,9g(ohneAkku)
Batterie Optionen
Art Spannung Kompatibel
NITECORE NL1835HP (3500mAh) 18650 3,6V Ja (empfohlen)
WiederauadbarerIMR18650Li-IonenAkku IMR 18650 3,6V Ja (empfohlen)
Wiederauadbarer18650Li-IonenAkku
( mit einem Ausgangsstrom von mehr als 8A )
18650 3,7V Ja
Standard Lithium Batterie CR123 3V Ja
wiederauadbarerLi-IonenAkku RCR123 3,7V Ja
Leistung & Leuchtdauer
FL1 STANDRAD
Turbo High Mid Low Ultralow Strobe SOS Beacon
1800LUMEN 810LUMEN 300LUMEN 80LUMEN 1LUMEN 1800LUMEN 1800LUMEN 1800LUMEN
*30min *1h30min 4h 15h 300h
— — —
220 Meter 153 Meter 84 Meter 40 Meter 5 Meter
— — —
12100 cd 5850 cd 1780 cd 400 cd 6.5 cd
— — —
1 Meter (bruchfeste Fallhöhe)
IPX8, 2 Meter (wasserdicht und tauchfähig)
HINWEIS: DieangegebenenWertewurdennachinternationalemANSI/NEMAFL1StandardunterVerwendungvon1x
NITECORE® IMR 18650 Akku (3,6V, 3100mAh) im Testlabor ermittelt. Die Werte können im Alltag, je nach Batteriezustand, -
typ,individuellenNutzungsgewohnheitenundUmwelteinüssenimrealenEinsatzvariieren.
*DieLeuchtdauerim"TURBO-Mode""HIGH-Mode"wurdeermitteltbevorsichdasTemperaturregulierungsmoduleinschaltet.
*Die1800Lumenim"TURBO-Mode"könnennurmitwiederauadbarenIMR18650oder18650Li-Ionen-Akkusmiteinem
Ausgangsstrom von mehr als 8A erreicht werden. Bei Verwendung von 18650 Li-Ionen-Akkus mit weniger als 8A ist der Turbo-
Mode NICHT zugänglich oder die Concept1 schaltet plötzlich ab. Der Turbo-Mode ist auch NICHT mit CR123A Batterien oder
RCR123A Akkus erreichbar.
Bedienungsanleitung
Einsetzen der Batterien
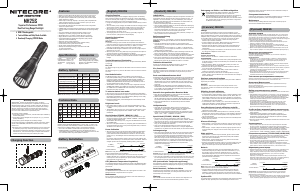
Legen Sie die Batterien ein, wie in der Abbildung dargestellt. Nach dem Einsetzen
der Batterien blinkt die Anzeige, um die Batteriespannung anzuzeigen (siehe dazu
Details im Bereich Power-Tipps). Danach wechselt die Taschenlampe in den Standby-
Mode.
WARNUNG:
1. Stellen Sie sicher, dass die Batterien korrekt installiert sind. Mit falsch eingelegten
Batterien wird die Concept 1 nicht funktionieren.
2. Im Turbo Modus wird die Concept 1 sehr heiß. Wegen der Überhitzungsgefahr
empfehlen wir den Turbo Modus nur kurzzeitig zu verwenden.
3.ACHTUNG!MöglicherweisegefährlicheoptischeStrahlung!BeiBetriebnichtdirekt
in das Licht blicken. Kann für die Augen gefährlich sein.
4. Wenn die Leistungsanzeige eine zu geringe Batteriespannung anzeigt, schalten Sie bitte das Licht aus und wechseln Sie die
Batterien/dieAkkus.
5. Tauchen Sie die heiße Concept 1 nicht in Wasser oder Flüssigkeiten ein. Dies erzeugt Druckschwankungen und birgt das
Risiko von Wasserschäden.
Mode Selection
Die Concept 1 hat zwei Arbeits-Modi:
● NormalMode:bietetausdemStandby-ModedirektenZugriaufdenTurbo-Mode
● TaktischerMode:bietetausdemStandby-ModedirektenZugriaufdenStrobe-Mode
Um zwischen dem Normal-Mode und dem taktischen Mode zu wechseln, führen Sie folgende Schritte aus:
1. Schalten Sie das Licht aus. Lösen Sie die Heck-Kappe für eine halbe Umdrehung.
2.ZiehenSiedieHeck-Kappefest,währendSiegleichzeitigdenSeitenschalterdrückenundhalten.
3. Das Licht blinkt, um anzuzeigen, welcher Mode ausgewählt wurde. Ein einzelnes Blinken zeigt den Normal- Mode an und zwei
Blinksignale zeigen den Taktischen Mode an.
Ein-/Ausschalten
Standby-Mode
Nach der Batterieinstallation schaltet die Concept 1 in den Standby-Mode.
HINWEIS: WennSiedieConcept1ineinerTascheoderähnlichemverstauenoderfürlängereZeitnichtnutzenwollen,so
lösen Sie die Endkappe um eine unbeabsichtigte Aktivierung der Lampe zu verhindern.
Einschalten
WennsichdieConcept1imStandby-Modebendet:
1. Halten Sie den Seitenschalter gedrückt, um das Licht mit der gespeicherten Helligkeitsstufe einzuschalten
2. Drücken Sie den Seitenschalter zweimal kurz, um den Ultralow-Mode zu aktivieren
3. Drücken Sie den Seitenschalter dreimal kurz, um im Normal-Mode den Turbo-Mode aufzurufen oder im Taktischen-Mode den
Strobe-Mode einzuschalten.
Abschalten:
Drücken Sie bei eingeschaltetem Licht den Seitenschalter kurz, um das Licht auszuschalten und den Standby-Mode zu aktivieren
Momentlicht des Turbo-Mode:
Drücken und halten Sie den Seitenschalter in jedem Betriebs-Mode, um in den Turbo-Mode zu schalten.
Einfach loslassen, um zur gespeicherten Helligkeit zurückzukehren.
Helligkeitsauswahl
Esstehen5HelligkeitsstufenzurVerfügung.WennSiesichimStandby-Modebenden,drückenundhaltenSieden
Seitenschalter, bis das Licht mit der vom letzten Mal gespeicherten Helligkeitsstufe eingeschaltet wird. Halten Sie den Schalter
weiter gedrückt, um nacheinander und wiederholt durch die Helligkeitsstufen "Ultralow" - "Low" - "Mid" - "High" - "Turbo"
zu schalten. Lassen Sie den Schalter los, um die aktuelle Helligkeitsstufe zu wählen und zu speichern. Um das Licht mit der
gewählten Helligkeit einzuschalten, tippen Sie einmal kurz auf den Schalter. Ebenso, um das Licht auszuschalten. Halten Sie den
Schalter gedrückt, um durch die 5 Helligkeitsstufen zu schalten.
Spezial Modi (Strobe / SOS / Beacon)
Einstellen des Strobe-Mode:
DrückenSiedenSchalterimStandby-oderjedemBeleuchtungs-Mode3-Malkurznacheinander.BendenSiesichimStrobe-
Mode, halten Sie den Schalter länger als eine Sekunde gedrückt, um fortlaufend nacheinander durch die Modi "SOS" - "Beacon"
- "Strobe" zu schalten. Entlasten Sie den Schalter, wenn der gewünschte Mode erreicht ist. Um die Spezial-Modi zu verlassen,
tippenSieeinmalkurzaufdenSchalter.DasLichtgehtausundSiebendensichimStandby-Mode.
ATR (erweiterte Temperaturregulierung)
Mit dem Advanced Temperature Regulation Modul reguliert die Concept 1 die Ausgangsleistung entsprechend
der Umgebungsumgebung, um eine optimale Funktion zu gewährleisten.
HINWEIS: Wenn die Concept 1 überhitzt ist, kann der Turbo-Mode nicht eingeschaltet werden.
Power-Tipps
Bei jedem Einsetzen der Batterien zeigt die blaue Anzeige die Batteriespannung an (auf ± 0,1 V genau). Wenn die
Batteriespannung beispielsweise bei einer maximalen Ladung von 4,2 V liegt, blinkt die LED viermal, gefolgt von 1,5 Sekunden
Pause und 2 weiteren Blinksignalen, bevor der Standby-Modus aktiviert wird. Unterschiedliche Spannungen stellen die
entsprechenden verbleibenden Batterieleistungspegel dar:
1×18650 battery
2×CR123 batteries
HINWEIS:BeiVerwendungvonzweiCR123/RCR123wirdnurdiedurchschnittlicheSpannungderbeidenBatterien/Akkus
angezeigt.
Batteriewechsel / Auaden der Akkus
Die Batterien sollten ausgetauscht oder die Akkus aufgeladen werden, wenn die Betriebsanzeige schnell blinkt, der Lichtkegel
dunkel erscheint oder die Taschenlampe nicht mehr reagiert.
Wartung
Alle6MonatesolltedasGewindemiteinemsauberenTuchabgewischtundanschließendmiteinerdünnenSchichtSilikonfett
geschmiert werden.
Garantiebedingungen
Alle NITECORE
®
ProduktegenießeneinenumfassendenGarantieschutz.BeieinerFehlfunktionderNITECORE
®
Concept
1TaschenlampekanndasGerätübereinenautorisiertenVertriebshändler/Händlerinnerhalbvon15TagennachKauf
ausgetauschtwerden.Nach15TagenkanndasGerätkostenfreiinnerhalbvon60Monaten(5Jahren)zumZweckeder
ReparaturzueinemautorisiertenVertriebshändler/Händlergeschicktwerden.Über60Monate(5Jahre)hinausdecktdie
GarantiedieArbeitskosten,jedochnichtdieKostenfürZubehör-oderErsatzteile.DerGarantieansprucherlischtbeim
Eintritt folgender Umstände:
1.DerArtikelwurdedurchkonstruktiveVeränderungenbeschädigtodermodiziert.
2.DerArtikelwurdedurchunsachgemäßenGebrauchbeschädigt.
3. Der Artikel wurde durch auslaufende Batterien beschädigt.
Für weitere Details der NITECORE
®
Garantie-BedingungenkontaktierenSiebitteeinenregionalenVertrieb/Händlerodersenden
※Alle Bilder, Texte und Erklärungen in dieser Bedienungsanleitung dienen lediglich Referenzzwecken. Sollte eine Diskrepanz
zwischendieserBedienungsanleitungunddenveröentlichtenInformationenaufderNitecoreWebsite»www.nitecore.com«
auftreten,geltendieInformationenunsereroziellenWebsite.SYSMAXInnovationsCo.,Ltd.behältsichdasRechtvor,den
Inhalt dieses Dokumentes jederzeit und ohne Vorankündigung zu ändern und zu interpretieren.
Allgemeine Hinweise
Altbatterien gehören nicht in den Hausmüll. Sie können gebrauchte Batterien unentgeltlich an unserer Versandlager
zurückgeben.AlsVerbrauchersindSiezurRückgabevonAltbatteriengesetzlichverpichtet.
+ IMR 18650 -
Battery
CR123
Battery
CR123
+ -
+ -
OR
3.5V 3.7V 3.9V 4.2V
Low power Full power
4.8V 5.6V 6.0V 6.4V
Características
• Ultra alta intensidad en una pequeña linterna
• Utiliza un LED CREE XHP35 HD E2 con una potencia máxima de hasta 1800 lúmenes
• Intensidad máxima del haz de hasta 12,100cd y distancia máxima de hasta 220 metros
• Tecnología de recubrimiento del cristal combinada con “Tecnología óptica de precisión digital” para un rendimiento extremo
delreector
• Duración máxima de batería de hasta 300 horas
• El botón lateral controla los 5 niveles de intensidad y 3 modos especiales
• Con indicador de batería integrado, la Concept 1 parpadea para indicar la carga restante de la batería y reporta el voltaje con
una precisión de ±0.1V
• Función de memoria inteligente (excepto para SOS y baliza de localización)
• Circuitodecorrientecontinuadealtaeciencia,proveeunasalidaconstante
• El módulo ATR incorporado regula automáticamente la intensidad y se adapta al medio ambiente para mantener un
rendimiento óptimo
• Protección contra polaridad invertida
• Cristalmineralendurecidoultraclaroconrecubrimientoanti-reejante
• Tapa trasera magnética con capacidad para sostenerse sobre la misma
• Construida con aleación de aluminio de grado aeronáutico con anodizado de grado militar HAIII
• Resistente al agua de acuerdo con IPX8 (sumergible 2 metros)
• Resistente a impactos desde 1 metros
Dimensiones Accesorios
Largo: 111.5mm (4.39”) Funda para cinturón, clip, correa, O-ring de repuesto
Diámetro de la cabeza: 24.5mm (0.96”)
Diámetro trasero: 23.8mm (0.94”)
Peso: 61.9g (2.18oz) (sin batería)
Opciones de batería
Tamaño Voltaje nominal Compatible
NITECORE NL1835HP (3500mAh) 18650 3.6V Si (Recomendado)
Batería recargable IMR18650 Li-ion IMR 18650 3.6V Si (Recomendado)
Batería Li-ion recargable 18650 (corriente de salida superior a 8A) 18650 3.7V Si
Batería primaria de litio CR123 3V Si
Batería recargable Li-ion RCR123 3.7V Si
Intensidad y duración
FL1 STANDRAD
Turbo Alto Medio Bajo Ultra bajo Estrobo SOS Baliza
1800LÚMENES 810LÚMENES 300LÚMENES 80LÚMENES 1LÚMEN 1800LÚMENES 1800LÚMENES 1800LÚMENES
*30min *1h30min 4h 15h 300h
— — —
220 metros 153 metros 84 metros 40 metros 5 metros
— — —
12,100 cd 5,850 cd 1,780 cd 400 cd 6.5 cd
— — —
1 metros (Resistente a impactos)
IPX8, 2 metros (Resistente al agua y sumergible)
NOTA: Los datos aquí mencionados han sido medidos de acuerdo con los estándares internacionales de pruebas de linternas
ANSI/NEMAFL1,usando1bateríaIMR18650(3.6V,3100mAh)bajocondicionesdelaboratorio.Losdatospuedenvariarenel
uso real debido al uso de diferentes baterías o condiciones ambientales.
* El tiempo de duración en modo Turbo o Alto es el resultado de pruebas antes de iniciar la regulación de temperatura.
* El modo Turbo 1800 lúmenes requiere el uso de baterías recargables IMR18650 o 18650 Li-ion con corriente de salida superior
a 8A. Si se utilizan baterías Li-ion con corriente de salida más baja que 8A, el modo Turbo no será accesible o la Concept 1 se
apagará de pronto. El modo Turbo no es accesible con baterías CR123A o RCR123A.Tenga en cuenta que el modo Turbo 1800
lúmenes no es accesible con baterías CR123A o RCR123A.
Instrucciones de operación
Instalación de la(s) batería(s)
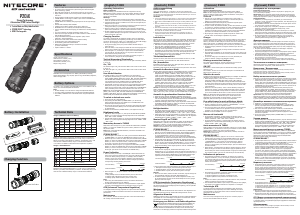
Inserte la(s) batería(s) como se muestra en la imagen. Después de la instalación de
la(s) batería(s), la luz parpadeará para reportar el voltaje de la(s) batería(s) (consulte
la sección Consejos de carga para más detalles) y entrará en modo de espera.
Advertencia
1. Asegúrese que la(s) batería(s) está(n) insertada(s) con el polo positivo (+)
apuntando hacia la cabeza de la linterna. La linterna no funcionará con las baterías
insertadas incorrectamente.
2. Al usar el modo Turbo, la cabeza de la Concept 1 se calentará. No es recomendable
usar el modo Turbo por un tiempo prolongado para evitar quemaduras.
3. Evite la exposición directa del haz con los ojos.
4. Si el reporte del voltaje de batería indica un nivel bajo, deje de usar la linterna y
extraiga la batería para cargarla.
5.Elproductonosedebesumergirenaguauotrolíquidocuandohayageneradoelcalorsuciente.Estocausarádesigualdades
de presión e incrementa de manera considerable el peligro de daños por agua.
Selección de modos
La Concept 1 tiene 2 modos de operación:
● Modogeneral:ofreceaccesodirectodelmododeesperaalmodoTurbo
● Modotáctico:ofreceaccesodirectodelmododeesperaalmodoEstrobo
ParacambiarentreelmodoGeneralyelmodoTáctico,sigalospasosmencionadosacontinuación:
1.Apaguelalinterna.Aojelatapatraseragirándolamediavuelta.
2. Apriete la tapa trasera mientras presiona y mantiene presionado el botón lateral simultáneamente.
3.Laluzparpadearáparaindicarcualmodofueseleccionado.UnsóloparpadeoindicaelmodoGeneral,ydosparpadeos
indican el modo Táctico.
Operación On/O
Modo de espera
Después de instalar la(s) batería(s), la Concept 1 entrará en modo de espera.
NOTA: Cuandodejeelproductoenunamochilaoalmacenadoporlargosperiodosdetiempo,porfavoraojelatapatrasera
para evitar activación accidental.
Encendido
Cuando la linterna está en modo de espera:
1. Presione y mantenga presionado el botón lateral hasta que la linterna encienda en la intensidad memorizada
2. Pulse el botón lateral rápidamente dos veces para activar la intensidad en ultra bajo
3.PulseelbotónlateralrápidamentetresvecesparaentraraTurboenelModoGeneraloentraraEstroboenModoTáctico
Apagado
Con la linterna encendida, pulse el botón lateral una vez para apagar y regresar al modo de espera.
Acceso rápido a Turbo
En cualquier modo de iluminación, presione y mantenga presionado el botón lateral para entrar a Turbo. Simplemente suelte
para regresar a la intensidad memorizada.
Selección de intensidad
Hay 5 niveles de intensidad disponibles. Cuando la linterna está en modo de espera, mantenga presionado el botón lateral hasta
que la linterna entre al nivel de intensidad memorizado de la última vez. Continúe presionando el botón para cambiar entre “Ultra
bajo-bajo-medio-alto-turbo”. Suelta el botón para seleccionar y memorizar el nivel de intensidad actual. Para volver a seleccionar
el nivel de intensidad, pulse el botón una vez para apagar la linterna y mantenga presionado el botón para cambiar entre los 5
niveles de intensidad.
Modos especiales (Estrobo/SOS/Baliza)
Para entrar al modo Estrobo:
1. Cuando está en modo de espera del modo táctico, pulse rápidamente el botón 3 veces.
2. Cuando está en cualquier intensidad, rápidamente pulse el botón 3 veces.
En el modo estrobo, mantenga presionado el botón por más de 1 segundo para cambiar entre “SOS-baliza-estrobo”. Suelte el
botón para seleccionar el modo especial actual. Para salir de los modos especiales, simplemente pulse el botón nuevamente
para apagar la linterna y entrar al modo de espera.
Tecnología ATR (Advanced Temperature Regulation)
Con el módulo avanzado de regulación de temperatura, la Concept 1 regula su intensidad y se adapta al medio ambiente,
manteniendo así un rendimiento óptimo.
Nota: Cuando la Concept 1 se sobrecalienta, turbo no puede ser accesado.
Consejos de carga
Cuando la alimentación está cortada, cada vez que se inserta la batería, la linterna informará el voltaje de la batería (cercano a
± 0.1V) (durante el reporte de voltaje de la batería, toque el botón para detenerlo). Por ejemplo, cuando el voltaje de la batería
está al máximo de 4,2 V, el indicador de batería parpadeará 4 veces, seguido por una pausa de 1.5 segundos y 2 parpadeos
antes de entrar en el modo de espera. Diferentes voltajes representan los niveles de carga de batería restantes
correspondientes:
1×18650 battery
2×CR123 batteries
Nota: alusardosbateríasCR123/RCR123enserie,lalinternasoloreportaráelvoltajepromedioentrelasdosbaterías.
Cambio de baterías
Las baterías deben ser recargadas o reemplazadas si ocurre alguna de las siguientes situaciones: la intensidad es tenue o la
linterna no responde.
Mantenimiento
Cada6mesessedeberánlimpiarlosempaquesconunpañolimpio,seguidoaesto,debeaplicarseunanacapadelubricante
a base de silicón.
Servicio de garantía
Todos los productos NITECORE
®
tienengarantíadecalidad.TodoproductoDOA/defectuosopuedeserremplazadopormedio
de un distribuidor local en los primeros 15 días después de la compra. Después de 15 días todos los productos NITECORE
®
defectuosos/confallaspuedenserreparadoslibredecostoporunperiodode60mesesapartirdelafechadeadquisición.
Después de 60 meses aplicará una garantía limitada, que cubre el costo de mano de obra y mantenimiento, más no el costo de
accesorios o recambio de piezas.
La garantía se cancelará en cualquiera de las siguientes situaciones:
1.El(los)producto(s)está(n)descompuesto(s),reconstruido(s)omodicado(s)porpartesnoautorizadas.
2. El(los) producto(s) está(n) dañado(s) por uso inapropiado.
3. El(los) producto(s) está(n) dañado(s) por fugas de las baterías.
Para la información más recientes sobre productos y servicios de NITECORE
®
, favor de ponerse en contacto con el distribuidor
nacional de NITECORE
®
※ElsitiowebocialdeNitecoreprevaleceráencasodecambiosenlosdatosdelproducto.
+ IMR 18650 -
Battery
CR123
Battery
CR123
+ -
+ -
OR
3.5V 3.7V 3.9V 4.2V
Low power Full power
4.8V 5.6V 6.0V 6.4V
SYSMAX Innovations Co., Ltd.
TEL: +86-20-83862000
FAX: +86-20-83882723
Web: www.nitecore.com
Address: Rm2601-06,CentralTower,No.5XiancunRoad,
TianheDistrict,Guangzhou,510623,Guangdong,
China
Thanks for purchasing NITECORE!
Please find us on facebook : NITECORE Flashlight
C1003120
Warranty Service
All NITECORE
®
productsarewarrantedforquality.DOA/defectiveproductscanbeexchangedfor
replacementthroughalocaldistributor/dealerwithinthe15daysofpurchase.After15days,all
defective/malfunctioningNITECORE
®
products will be repaired free of charge for a period of 60
months from the date of purchase. After 60 months, a limited warranty applies, covering the cost of
labor and maintenance, but not the cost of accessories or replacement parts.
Thewarrantyisnulliedinallofthefollowingsituations:
1. Theproduct(s)is/arebrokendown,reconstructedand/ormodiedbyunauthorizedparties.
2. Theproduct(s)is/aredamagedthroughimproperuse.
3. Theproduct(s)is/aredamagedbyleakageofbatteries.
For the latest information on NITECORE
®
products and services, please contact your national
NITECORE
®
※
TheNitecoreocialwebsiteshallprevailincaseofanyproductdatachanges.
· English
· Español
· Deutsch
· Francais
· Русский
·
日本語
·
한국어
· Română
·
简体中文
Concept Series
Concept 1
Caractéristiques
• Puissante lampe de poche
• Led CREE XHP35 HD E2 avec éclairage maximum de 1800 lumens
• Pic d’intensité de 12,100 candelas et portée de 220 mètres
• Réecteurs“PrecisionDigitalOpticsTechnology”hauteperformance
• Autonomie maximale de 300 heures
• Interrupteur permettant d’accéder à 5 niveaux d’éclairage et 3 modes spéciaux
• Indicateur lumineux intégré indiquant la batterie restante (breveté)
• Indicateur lumineux secondaire indiquant le voltage de la batterie (précision 0,1V)
• Fonction mémoire intelligente (excepté pour les modes SOS et balise)
• Circuitderégulationhauteperformanceorantunéclairageconstant
• Le système avancé de régulation de la température (ATR) permet à la lampe d’ajuster de façon dynamique son niveau
d’éclairage en fonction de sa température interne
• Protection empêchant tout endommagement de la lampe dû à une insertion incorrecte des batteries
• Lentillesenverreminéraldurcitraitéesantireets
• Base plate permettant une stabilité verticale (usage type bougie
• Construitenalliaged’aluminiumdegradeaéronautiqueavecanodisationdurequalitémilitaire«HAIII»
• Etanche conformément à la norme IPX8 (jusqu’à 2 m de profondeur)
• Résiste à des chutes de 1 m de hauteur
Dimensions
Longueur : 111.5mm
Diamètre tête : 24.5mm
Diamètre corps : 23.8mm
Poids : 61.9g (sans batterie)
Accessoires
Etui, clip, dragonne, joint torique de rechange
Options Batteries
taille Voltage Nominal Compatible
NITECORE NL1835HP (3500mAh) 18650 3.6V Oui (Recommandé)
Batterie IMR18650 Li-ion Rechargeable IMR 18650 3.6V Oui (Recommandé)
Batterie 18650 Rechargeable Li-ion
(doivent être capables d'un courant de
décharge d'au moins 8A chacune)
18650 3.7V Oui
Batterie standard Lithium CR123 3V Oui
Batterie Li-ion Rechargeable RCR123 3.7V Oui
Eclairage et autonomie
FL1 STANDRAD
Turbo High Mid Low Ultralow Stroboscope SOS Balise
1800LUMEN 810LUMEN 300LUMEN 80LUMEN 1LUMEN 1800LUMEN 1800LUMEN 1800LUMEN
*30min *1h30min 4h 15h 300h — — —
220 m
153 m 84 m 40 m 5 m
— — —
12,100 cd
5,850 cd 1,780 cd 400 cd 6.5 cd
— — —
1 m (Résistance aux chocs)
IPX8, 2 m (Etanche et submersible)
NOTE: LesdonnéesontétémesuréesconformémentàlanormeANSI/NEMAFL1concernantlesproduitsd’éclairageportatifs,
en utilisant 1 batterie IMR18650 (3,6V 3100mAh) dans des conditions de laboratoire. Les données peuvent varier légèrement
pour un usage réel en fonction du type de piles, des habitudes individuelles d’utilisation et des facteurs environnementaux..
* Les données pour le mode “turbo” et “high” sont obtenus avant de commencer la régulation de température.
* L’utilisation du turbo 1800 lumens : Toutes les batteries 18650 doivent être capables d'un courant de décharge d'au moins
8A chacune. Si vous utilisez des batteries 18650 Li-ion avec un courant de sortie inférieur à 8A, Le mode Turbo ne sera pas
accessible ou la lampe Concept1 s'éteindra brusquement. Ce mode Turbo 1800 lumens n’est pas accessible avec les batteries
CR123A ou RCR123A.
Instructions
Insertion des batteries/piles
Insérez comme sur l’illustration.
NOTE : Après la mise en place des piles, l’indicateur lumineux clignote pour indiquer
levoltage(Voirlasection«Batterie»decemoded’emploipourplusdedetails)et
entre en mode standby.
AVERTISSEMENT
1. Assurez-vous que la batterie est insérée avec le pôle positif pointant vers la tête
de la lampe. La lampe ne fonctionnera pas si la batterie est installée de façon
incorrecte.
2.EnModeturbo,latêtedelaConcept1peutchauer.Pourévitertoutebrûlureil
est conseillé de ne pas utiliser ce mode sur une longue durée.
3. Evitez de diriger le faisceau de lumière directement dans les yeux.
4.Silalampedevientfaibleounerépondplusauxréglages,celasignieégalementquelesbatteries/pilesdoiventêtre
remplacées ou rechargées.
5.Lorsquelalampeestchaude,n’essayezpasdelarefroidirenl’immergeantdansunliquide.Acausedeladiérenceentre
pressions interne et externe, la lampe Concept 1 pourrait subir des dommages irréparables.
Selection des modes
La lampe Concept 1 possède 2 modes d’utilisation :
● ModeGénéral:oreunaccèsdirectaumodeTurbodepuislemodeStandby
● ModeTactique:oreunaccèsdirectaumodeStrobedepuislemodeStandby
PournaviguerdumodeGeneralaumodetactique:
1. Eteindre la lampe. Dévisser la base d’un demi-tour.
2. Reserrer la base en appuyant simultanément sur le bouton latéral.
3.Levoyantclignotepourindiquerquelmodeaétésélectionné.1clignotementpourlemodeGeneralet2clignotementspour
le mode Tactique.
On/O
Mode Standby
Après installation des batteries la lampe Concept 1 entre en mode Standby .
NOTE: Pour éviter toute activation accidentelle, pensez à déserrer le capuchon lorsque vous placez la lampe dans un sac ou
lorsque vous le stockez.
Eclairage
Lorsque la lampe est en mode Standby:
1. Maintenir l’interrupteur enfoncé jusqu'à la luminosité mémorisée
2. Appuyer 2 fois sur l’interrupteur lateral pour accéder à la luminosité ultra-low
3. Appuyer 3 fois rapidement sur cet interrupteur pour accéder rapidement au Turbo dans le mode general ou pour accéder au
Strobe dans le mode tactique.
Extinction:
Lorsque la lumière est allumée, appuyez 1 fois sur l’interrupteur latéral et retrounez au mode standby.
Accès rapide au Turbo:
Dans n’importe quel éclairage, maintenir l’interrupteur latéral enfoncé pour activer le Turbo. Relâcher pour revenir à la
luminosité mémorisée.
Niveaux d’éclairage
5 niveaux d’éclairage sont disponibles. Quand la lampe est en mode standby, appuyez sur l’interrupteur latéral pour accéder à la
dernière luminosité. Appuyez plusieurs fois sur le bouton pour naviguer entre les niveaux Très bas, Bas, Moyen, Fort et turbo.
Relâchez l’interrupteur pour mémoriser le niveau de luminosité atteint.
Pour sélectionner de nouveau le niveau de luminosité, appuyez une fois sur l’interrupteur pour éteindre la lampe et maintenez le
bouton enfoncé pour naviguer entre les 5 niveaux de luminosité.
Mode Spécial Stroboscope/SOS/Balise
Pour accéder au mode strobe :
1. En position standby du mode Tactique, appuyez rapidement 3 fois sur l’interrupteur.
2. Dans n’importe quel éclairage, appuyez rapidement 3 fois sur l’interrupteur.
Dans le mode strobe, appuyez sur le bouton pendant plus d’une seconde pour naviguer entre “SOS-balise-strobe”. Pour quitter
ces modes et revenir au dernier niveau d’éclairage utilisé, appuyez simplement sur le bouton.
Système ATR
Le système avancé de régulation de la température (ATR) permet à la lampe d’ajuster de façon dynamique son niveau d’éclairage
en fonction de sa température interne .
Note: Si la lampe Concept 1 est trop chaude, Le mode Turbo ne pourra s’activer.
Remplacement des batteries
Lorsque la lampe est éteinte, à chaque changement de batteries, l’indicateur lumineux clignotera pour indiquer le voltage de la
batterie à 0,1V près (Pendant le signalement de la tension de la batterie, appuyez sur le bouton pour l'arrêter). Par exemple,
quand le voltage est de 4,2V, l’indicateur lumineux s’allumera 4 fois, puis, après 1.5 seconde de pause, 2 nouvelles fois, avant
de réactiver le dernier niveau d’éclairage utilisé. Le voltage indiqué correspond à la batterie restante:
1×18650 battery
2×CR123 batteries
Note: LorsquevousutilisezdeuxCR123/RCR123,lalampedepocheindiqueseulementlatensionmoyenneentrelesdeux
batteries.
Changement des batteries
Lorsquel’indicateurlumineuxclignoterapidement,lesbatteries/pilesontbesoind’êtreremplacéesourechargées.Silalampe
devientfaibleounerépondplusauxréglages,celasignieégalementquelesbatteries/pilesdoiventêtreremplacéesou
rechargées.
Maintenance
Touslessixmois,leletagedoitêtreessuyéavecunchionpropreetrecouvertd’unlubriantàbasedesilicone.
Service de garantie
Tous les produits NITECORE
®
sont garantis pour leur qualité. Les produits défectueux peuvent être échangés par l’intermédiaire
du distributeur local dans les 15 jours suivant l’achat. Après 15 jours, tous les produits NITECORE
®
défectueux peuvent être
réparés gratuitement pendant les 60 mois (5 ans) suivant l’achat. Après 60 mois, une garantie limitée s’applique, couvrant les
coûts de main d’œuvre et maintenance, mais pas le coût des pièces détachées.
La garantie est annulée dans les situations suivantes :
1.Le(s)produit(s)est/sontdécomposé(s),reconstruit(s)et/oumodié(s)pardespersonnesnonautorisées.
2.Le(s)produit(s)est/sontendommagéssuiteàunusageinapproprié.
3.Le(s)produit(s)est/sontendommagéssuiteàdesfuitesdebatteries.
Pour les dernières informations sur les produits et services NITECORE
®
, contactez votre distributeur national NITECORE
®
ou
※LesiteocieldeNitecoreprévautencasdemodicationsdesdonnéesproduit.
+ IMR 18650 -
Battery
CR123
Battery
CR123
+ -
+ -
OR
3.5V 3.7V 3.9V 4.2V
Low power Full power
4.8V 5.6V 6.0V 6.4V
The head of Concept 1 will generate heat in Turbo mode soon, so it
is not recommended to use Turbo mode for a long time in case of
scalding.
MadeinChina


この商品に関する会話に参加する
ここでは、Nitecore Concept 1 懐中電灯 についての意見を共有できます。 疑問がある場合は、まず説明書をよく読んでください。 マニュアルのご請求は、お問い合わせフォームより承ります。