1
2
1
2
1
2
Important safety
information
Read this important information
carefully before you use the
appliance and its accessories and
save it for future reference. The
accessories supplied may vary for
dierent products.
Danger
- Keep the appliance dry (Fig. 2).
Warning
- This appliance can be used by
children aged from 8 years and
above and persons with reduced
physical, sensory or mental
capabilities or lack of experience
and knowledge if they have been
given supervision or instruction
concerning use of the appliance
in a safe way and understand
the hazards involved. Children
shall not play with the appliance.
Cleaning and user maintenance
shall not be made by children
without supervision.
- Always check the appliance
before you use it. Do not use the
appliance if it is damaged, as this
may cause injury. Always replace
a damaged part with one of the
original type.
- Do not open the appliance to
replace the rechargeable battery.
Caution
- Only use this appliance for its
intended purpose as shown in the
user manual.
- For hygienic reasons, the
appliance should only be used by
one person.
- Charge, use and store the
appliance at a temperature
between 5 °C and 35 °C.
- Never use compressed air,
scouring pads, abrasive cleaning
agents or aggressive liquids such
as petrol or acetone to clean the
appliance.
- Do not charge the appliance in or
near wall sockets that contain an
electric air freshener to prevent
irreparable damage to the
appliance.
Electromagnetic elds (EMF)
This Philips appliance complies
with all applicable standards and
regulations regarding exposure to
electromagnetic elds.
General
- The appliance is suitable for
voltages ranging from 100 to 240
volts.
Introduction
Congratulations on your purchase
and welcome to Philips! To fully
benet from the support that Philips
oers, register your product at www.
philips.com/welcome.
Please read this user manual, as
it contains information about the
features of this shaver as well as
some tips to make shaving easier and
more enjoyable.
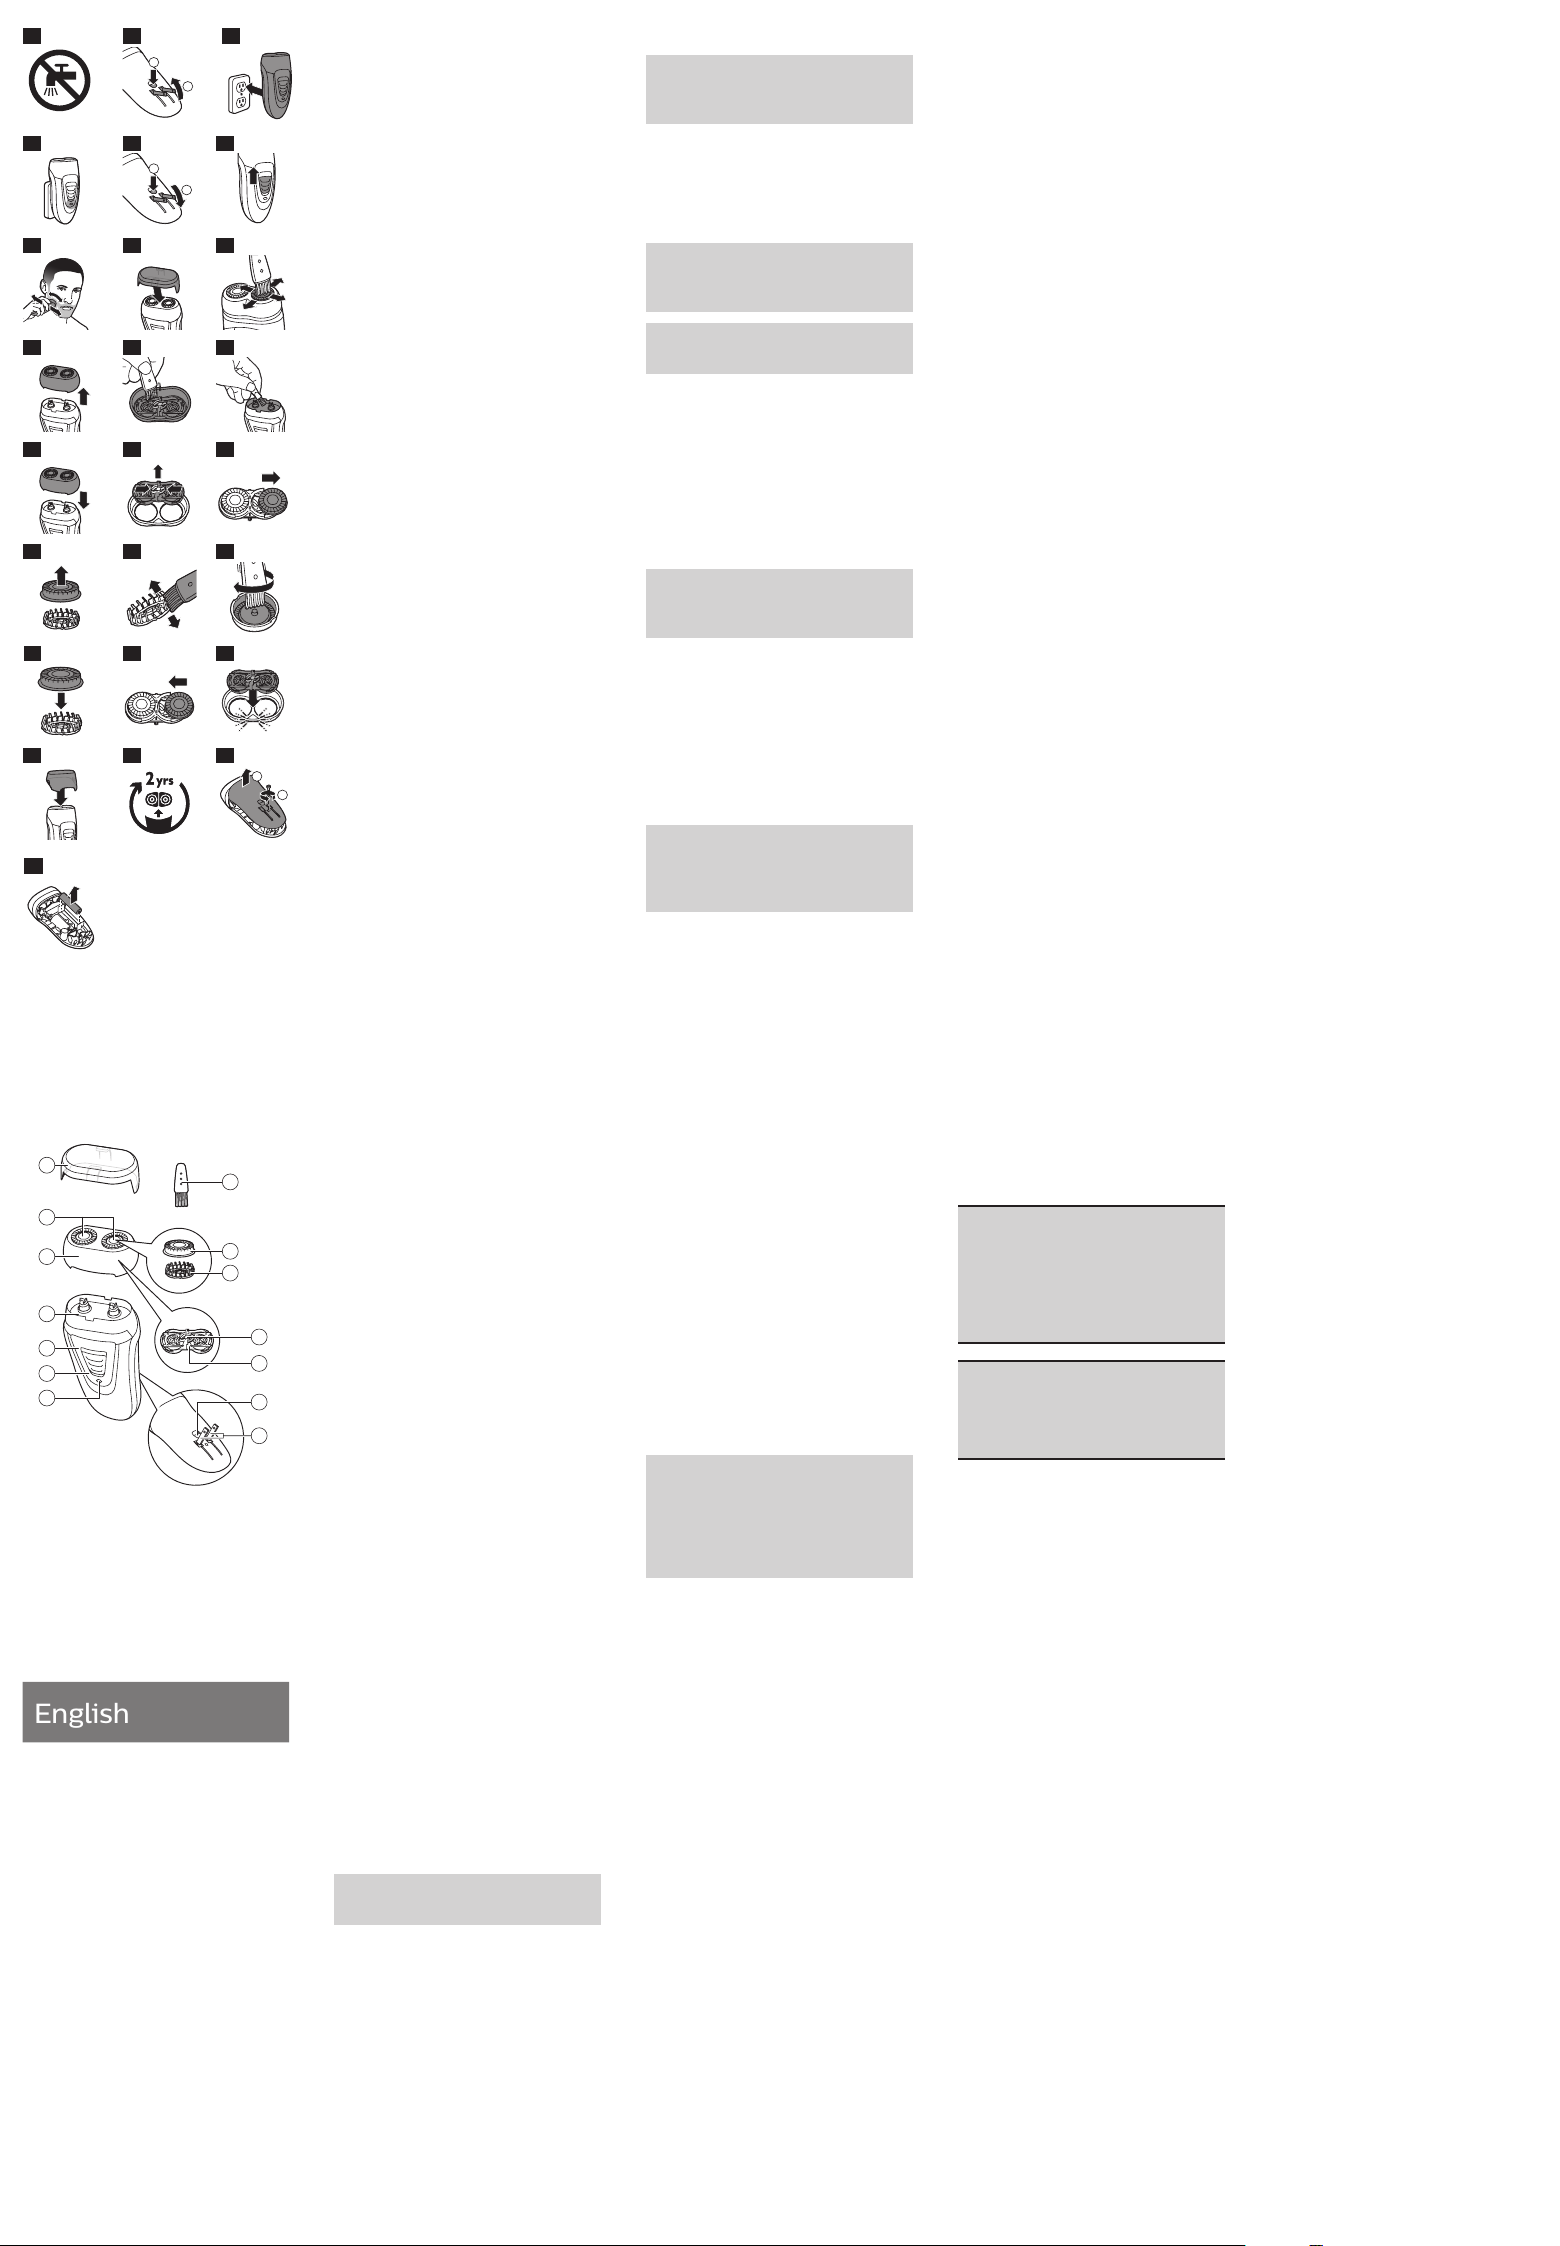
Charging
Charge the appliance when the
motor stops or starts running slower.
When you charge the shaver for the
rst time or after a long period of
non-use, let it charge continuously
for 12 hours. Charging normally takes
approx. 10 hours. Do not leave the
appliance connected to the wall
socket for more than 24 hours.
1 Switch o the shaver before you
start charging it.
2 Press the release (1) button and
fold out the foldable plug (‘click’)
(Fig. 3).
3 Insert the foldable plug into the
wall socket (Fig. 4).
The charging light goes on to
indicate that the appliance is
charging. (Fig. 5)
4 Remove the shaver from the wall
socket when the battery is fully
charged, after approx. 10 hours.
Note: The charging light does not
go out or change color when the
appliance is fully charged.
5 Press the release button (1) and
fold the foldable plug back into the
appliance (‘click’) (Fig. 6).
- A fully charged shaver has a
shaving time of approximately 30
minutes.
Using the appliance
Note: The shaver cannot be used
directly from the mains. The shaver
cannot be switched on when it is
connected to the wall socket.
1 Remove the protection cap.
2 Push the on/o slide upwards to
switch on the shaver (Fig. 7).
3 Move the shaving heads over
your skin. Make both straight and
circular movements (Fig. 8).
Note: Shave on a dry face only. Do
not use the shaver in combination
with shaving gel, shaving foam or
water.
Note: Your skin may need 2 to 3
weeks to get accustomed to the
new Philips shaving system.
4 Push the on/o slide downwards
to switch o the shaver.
5 Clean the shaver after every shave
(see ‚Cleaning and maintenance‘).
6 Put the protection cap on the
shaver after use to prevent
damage and dirt accumulation in
the shaving heads (Fig. 9).
Cleaning and maintenance
Never use scouring pads, abrasive
cleaning agents or aggressive liquids
such as petrol or acetone to clean
the shaver and its accessories.
Clean the shaver after every
shave to guarantee better shaving
performance.
After every shave: shaving unit
and hair chamber
- For the best cleaning result, we
advise you to use Philips Cleaning
Spray (HQ110). Ask your Philips
dealer for information.
Philips Shaving Head Cleaning Spray
(HQ110) may not be available in all
countries. Contact the Consumer
Care Centre in your country about
the availability of this accessory.
1 Switch o the appliance.
2 Clean the top of the appliance with
the cleaning brush supplied (Fig.
10).
3 To remove the shaving unit, pull
it straight o the appliance (Fig. 11).
4 Clean the inside of the shaving unit
with the cleaning brush (Fig. 12).
5 Clean the hair chamber with the
cleaning brush (Fig. 13).
6 Put the shaving unit back onto the
shaver (Fig. 14).
Every two months: shaving
heads
Preparation
1 Switch o the appliance.
2 To remove the shaving unit, pull
it straight o the appliance (Fig. 11).
Remove the shaving heads
1 Push the sides of the central spring
towards each other and lift the
retaining frame out of the shaving
unit (Fig. 15).
2 Slide the shaving heads out of the
retaining frame (Fig. 16). Remove
and clean one shaving head at a
time. Each shaving head consists
of a cutter and a guard.
Note: Do not clean more than
one cutter and shaving guard at
a time, they are all matching sets.
If you accidentally put a cutter in
the wrong shaving guard, it may
take several weeks before optimal
shaving performance is restored.
3 Remove the guard from the cutter
(Fig. 17).
Clean the cutter and the guard
1 Clean the cutter with the cleaning
brush. Brush carefully in the
direction of the arrows (Fig. 18).
2 Clean the guard with the cleaning
brush (Fig. 19).
Install the shaving heads
1 Put the cutter back into the guard
(Fig. 20).
2 Slide the shaving heads back into
the retaining frame (Fig. 21).
3 Put the retaining frame back into
the shaving unit (‘click’) (Fig. 22).
4 Put the shaving unit back onto the
shaver (Fig. 14).
Storage
Keep the appliance dry (Fig. 2).
Store the appliance in a safe and dry
place.
1 Switch o the appliance.
2 Put the protection cap on the
shaving unit after use to prevent
damage and to avoid dirt
accumulation in the shaving heads
(Fig. 23).
Replacement
For maximum shaving performance,
we advise you to replace the shaving
heads every two years (Fig. 24).
Replace damaged shaving heads
immediately. Always replace the
shaving heads with original Philips
shaving heads (see ‚Ordering
accessories‘).
For instructions on how to remove
the shaving heads, see chapter
‚Cleaning and maintenance‘, section
‚Every two months: shaving heads‘.
Ordering accessories
To buy accessories or spare parts,
visit www.philips.com/parts-and-
accessories or go to your Philips
dealer. You can also contact the
Philips Consumer Care Center in
your country (see the international
warranty leaet for contact details).
The following accessories and spare
parts are available:
- HQ56 shaving heads.
- HQ110 Philips shaving head
cleaning spray.
Recycling
- Do not throw away the product
with the normal household waste
at the end of its life, but hand it in
at an ocial collection point for
recycling. By doing this, you help to
preserve the environment.
- This product contains a built-in
rechargeable battery which shall
not be disposed of with normal
household waste. Please take your
product to an ocial collection
point or a Philips service center to
have a professional remove the
rechargeable battery.
- Follow your country’s rules for the
separate collection of electrical
and electronic products and
rechargeable batteries. Correct
disposal helps prevent negative
consequences for the environment
and human health.
Removing the rechargeable
battery
Only remove the rechargeable
battery when you discard the
product. Before you remove
the battery, make sure that the
product is disconnected from the
wall socket and that the battery is
completely empty.
Take any necessary safety
precautions when you handle
tools to open the product
and when you dispose of the
rechargeable battery.
1 Make sure that the appliance is
switched o and disconnected
from the wall socket.
2 Let the shaver run until it stops,
unscrew the screws on the back of
the appliance (1) and remove the
rear panel from the appliance (2)
(Fig. 25).
3 Remove the rechargeable battery
(Fig. 26).
4 After removing the battery, do not
connect the appliance to the wall
socket.
Warranty and support
If you need information or support,
please visit www.philips.com/
support or read the international
warranty leaet.
Warranty restrictions
The shaving heads (cutters and
guards) are not covered by the terms
of the international warranty because
they are subject to wear.
1
2
3
4
5
6
7
8
9
10
11
12
13
14
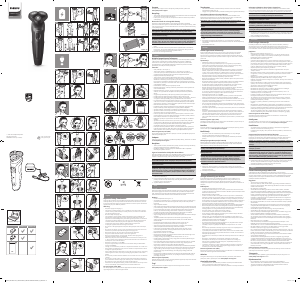
General description (Fig. 1)
1 Protection cap
2 Shaving heads
3 Shaving unit
4 Hair chamber
5 Front panel
6 On/o slide
7 Charging light
8 Foldable plug
9 Release button of foldable plug
10 Retaining frame
11 Shaving heads
12 Cutter
13 Guard
14 Cleaning brush


この商品に関する会話に参加する
ここでは、フィリップス PQ190 シェーバー についての意見を共有できます。 疑問がある場合は、まず説明書をよく読んでください。 マニュアルのご請求は、お問い合わせフォームより承ります。