説明書 Nitecore DL20 懐中電灯
Nitecore DL20 懐中電灯 のマニュアルが必要ですか? 以下では、日本語の PDF マニュアルを無料で表示およびダウンロードできます。 この製品には現在、2 件のよくある質問、0 件のコメントがあり、0 件の投票があります。 これがご希望のマニュアルではない場合は、お問い合わせください。
ご利用の製品に欠陥があり、マニュアルでは解決出来ない問題ですか。無料の修理サービスを行うRepair Café (Repair Café) に移動します。
説明書
Loading…

(English) User ManualFeatures
Specications
Accessories
Battery Options
Technical Data
(Español) Manual de usuario (Deutsch) Benutzerhandbuch
(Francais) Mode d’emploi
• A diving light specially designed for underwater activities
• Utilizes a CREE XP-L HI V3 LED to emit a max output of 1,000 lumens
• Integrated red light serves as an auxiliary light supplement for underwater
photography
• Crystal Coating Technology combined with “Precision Digital Optics
Technology” for extreme reector performance
• Max beam intensity up to 12,400cd and beam distance up to 223 meters
• High ecient constant current circuit board provides max runtime of 9
hours
• Reverse polarity protection
• Toughened ultra-clear mineral glass with anti-scratch coating
• Constructed from aero grade aluminum alloy with HAIII military grade
hard-anodized nish
• In accordance with IPX8 and 100 meters submersible
• Impact resistance up to 1 meter
• Tail stand capability
Length: 133.1mm (5.24”)
Head Diameter: 34mm (1.34”)
Tail Diameter: 25.4mm (1”)
Weight: 135.5g (4.78oz) (Batteries Not Included)
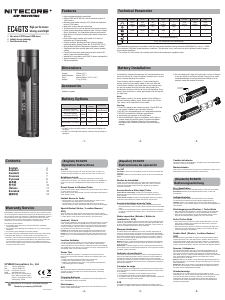
FL1
STANDARD
White Light Red Light
White Light
Strobe
High Low High Low
1000
Lumens
385
Lumens
115
Lumens
55
Lumens
1000
Lumens
*1h15min 4h 4h15min 9h /
223m 148m 25m 18m /
12400cd 5500cd 160cd 77cd /
1m (Impact Resistance)
IPX8, 100m (waterproof and submersible)
NOTE: The above data has been measured in accordance with the
international ashlight testing standards ANSI/NEMA FL1, using 1 x 18650
battery (3,400mAh) under laboratory conditions. The data may vary in real-
world use due to dierent battery use or environmental conditions.
* The runtime for High Mode of White Light is the testing result before
starting temperature regulation.
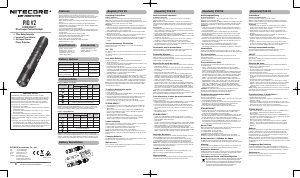
Lanyard, Spare O Ring×4
Type Nominal Voltage Compatibility
18650 Rechargeable
Li-ion Battery
18650 3.6V/3.7V
Y
(Recommended)
Primary Lithium Battery CR123 3V
Y
(Recommended)
Rechargeable
Li-ionBattery
RCR123 3.6V/3.7V
Y
(Recommended)
Operating Instructions
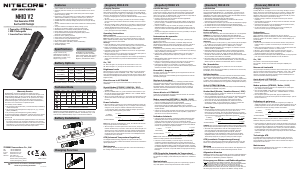
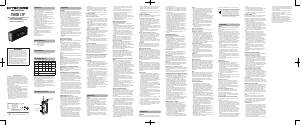
Battery Installation
Insert battery with the
positive poles pointing
forward as illustrated in the
diagram.
Warning:
1. Ensure batteries are
inserted with the positive
(+) end pointing to the
head. The DL20 will not
operate with incorrectly
inserted batteries.
2. Avoid direct eye exposure.
3. When the DL20 is kept in a
backpack or left unused for
extended periods of time,
NITECORE recommends
to remove all batteries
to prevent accidental
activation of the ashlight or battery leakage.
ON/OFF
Turn on: Long press switch 1 to enter the high mode of the white light.
Long press switch 2 to turn on the red light. White light and red light can be
turned on simultaneously.
Turn o: When the white light is on, long press switch 1 to turn the white
light o; and when the red light is on, long press switch 2 to turn the red
light o.
Brightness Levels
White Light: Two brightness levels selectable. When the white light is on,
tapping the switch 1 to change the brightness.
Red Light: Two brightness levels selectable. When the red light is on, tap
switch 2 to change the brightness.
Special Mode (White Light Strobe)
Whether the DL20 is on or o, long press switch 1 and switch 2
simultaneously to enter strobe mode. Tap any switch to exit and return to
the previously used mode.
ATR(Advanced Temperature Regulation)
With Advanced Temperature Regulation module, the DL20 regulates its
output and adapts to the ambient environment, maintaining optimal
performance.
Replacing Battery
Batteries should be replaced when the following occurs: The white LED
blinks quickly for 2 seconds and automatically lowers its output.
NOTE: Please ensure the surface of the light is dry before taking the battery
out for replacement.
Maintenance
Every 6 months, threads should be wiped with a clean cloth followed by a
thin coating of silicon-based lubricant.
Switch 2
Switch 1
Instrucciones de operación
Instalación de batería(s)
Inserte la(s) batería(s) con el polo positivo apuntando hacia adelante como
se muestra en el diagrama.
Advertencia:
1. Asegúrese que las baterías
están insertadas con el
polo positivo (+) hacia
la cabeza de la linterna.
La DL20 no operará con
las baterías insertadas
incorrectamente.
2. Evite la exposición directa
a los ojos.
3. Cuando mantenga la
DL20 en una mochila o
la deje sin uso por largos
periodos de tiempo,
NITECORE recomienda
remover todas las baterías
para prevenir activación
accidental de la linterna o
fugas en las baterías.
ON/OFF
Encendido: Mantenga presionado el botón 1 para entrar en el modo alto de
la luz blanca. Mantenga presionado el botón 2 para encender la luz roja. La
luz blanca y la luz roja pueden ser encendidas simultáneamente.
Apagado: Cuando la luz blanca está encendida, mantenga presionado el
botón 1 para apagar la luz blanca; y cuando la luz roja está encendida,
mantenga presionado el botón 2 para apagar la luz roja.
Niveles de intensidad
Luz blanca: Dos niveles de intensidad seleccionables. Cuando la luz blanca
está encendida, toque el botón 1 para cambiar la intensidad.
Luz roja: Dos niveles de intensidad seleccionables. Cuando la luz roja está
encendida, toque el botón 2 para cambiar la intensidad.
Modo especial (Estrobo de luz blanca)
Si la DL20 está encendida o apagada, mantenga presionados los botones 1 y
2 simultáneamente para entrar al modo estrobo. Toque cualquier botón para
salir y regresar al modo usado previamente.
ATR (Regulación Avanzada de Temperatura)
Con el módulo Avanzado de Regulación de Temperatura, la DL20 regula si
intensidad y se adapta al medio ambiente, manteniendo un rendimiento
óptimo
Sustitución de la batería
Las baterías deben ser reemplazadas cuando ocurra lo siguiente: El LED
blanco parpadea rápidamente por 2 segundos y automáticamente baja su
intensidad.
NOTA: Por favor asegúrese que la supercie de la linterna está seca antes
de sacar la batería para reemplazarla.
Mantenimiento
Cada 6 meses, los sellos deben limpiarse con un paño limpio, seguido a esto,
aplique una na capa de lubricante a base de silicón.
Switch 2
Switch 1
Bedienungsanleitung
Einsetzen der Batterie
Legen Sie die Akkus/Batterien - wie dargestellt - mit dem positiven Pol (+) in
Richtung Lampenkopf ein.
HINWEIS:
1. Stellen Sie sicher, dass
der positive Pol (+) in
Richtung Kopf zeigt. Die
DL20 wird andernfalls
nicht funktionieren.
2. Stellen Sie beim
Einschalten der DL20
sicher, dass der Lichtstrahl
nicht direkt in die Augen
von Menschen oder Tieren
gerichtet ist.
3. Wenn die Taschenlampe
im Rucksack transportiert
oder lange gelagert wird,
entnehmen Sie bitte die
Akkus/Batterien, um eine
versehentliche Aktivierung
oder Leckagen zu vermeiden.
Ein-/Ausschalten
Einschalten: Um in den "HIGH"-Mode des weißen Lichts zu gelangen,
drücken Sie den Schalter 1 länger. Drücken Sie länger auf den Schalter
2, schalten Sie das rote Licht ein. Weißes Licht und rotes Licht können
gleichzeitig eingeschaltet werden.
Ausschalten: Wenn das weiße Licht eingeschaltet ist, drücken Sie den
Schalter 1 erneut, um das weiße Licht auszuschalten. Wenn das rote Licht
eingeschaltet ist, drücken Sie den Schalter 2 länger, um das rote Licht
auszuschalten.
Helligkeitseinstellungen
Weißes Licht: Es sind zwei Helligkeitsstufen wählbar. Wenn das weiße Licht
eingeschaltet ist, tippen Sie kurz auf Schalter 1, um die Helligkeit zu ändern.
Rotlicht: Auch hier sind zwei Helligkeitsstufen wählbar. Wenn das rote Licht
eingeschaltet ist, tippen Sie kurz auf Schalter 2, um die Helligkeit zu ändern.
Sonder-Modi (Weißlicht Strobe)
Um in den Strobe-Mode zu schalten, drücken Sie gleichzeitig länger auf beide
Schalter. Um den Strobe-Mode zu verlassen und in den vorher genutzten
Mode zu schalten, tippen Sie kurz auf einen der beiden Schalter.
ATR (erweiterte Temperaturregulierung)
Mit Advanced Temperature Regulation Modul regelt die DL20 ihre Leistung
und passt sich der Umgebungsumgebung an, um so einen optimalen
Betriebszustand zu halten.
Wechsel der Akkus/Batterien
Die Akkus sollten aufgeladen oder die Batterien ersetzt werden, wenn der
Lichtschein dunkel erscheint oder die Taschenlampe nicht mehr reagiert.
HINWEIS: Bitte stellen Sie sicher, dass die Oberäche der Lampe trocken
ist, bevor Sie den Akku herausnehmen.
Wartung
Alle 6 Monate sollte das Gewinde mit einem sauberen Tuch abgewischt und
anschließend mit einer dünnen Schicht Silikonfett geschmiert werden.
Allgemeine Hinweise
Altbatterien gehören nicht in den Hausmüll. Sie können gebrauchte Batterien
unentgeltlich an unser Versandlager zurückgeben. Als Verbraucher sind Sie
zur Rückgabe von Altbatterien gesetzlich verpichtet.
Switch 2
Switch 1
Intructions
Insertion des batteries/plies
Insérez comme sur l’illustration.
Avertissement
1. Assurez –vous que la
batterie est insérée avec
le pôle positif pointant
vers la tête de la lampe.
La lampe ne fonctionnera
pas si la batterie est
installée de façon
incorrecte.
2. Evitez de diriger le
faisceau de lumière
directement dans les
yeux.
3. Quand la lampe est mise
dans un sac à dos ou
n’est pas utilisée pour une
période longue, il faut
retirer toutes les batteries
an de prévenir l’activation accidentelle ou la fuite des batteries.
ON/OFF
ON : Appuyer longuement sur l’interrupteur 1 pour entrer dans le mode
High de la lumière blanche. Appuyer longuement sur l’interrupteur 2 pour
allumer la lumière rouge. La lumière blanche et la lumière rouge peuvent
être allumées simultanément.
OFF : Lorsque la lumière blanche est allumée, appuyer longuement sur
l’interrupteur 1 pour éteindre la lumière blanche ; Et lorsque la lumière
rouge est allumée, appuyer longuement sur l’interrupteur 2 pour éteindre la
lumière rouge.
Niveaux d’Eclairage
Lumière Blanche : Deux luminosités à choisir. Lorsque la lumière blanche
est allumée, presser l’interrupteur 1 pour changer la luminosité.
Lumière Rouge : Deux luminosités à choisir. Lorsque la lumière rouge est
allumée, presser l’interrupteur 2 pour changer la luminosité.
Mode Spécial (Lumière Blanche Strobe)
Maintenir appuyé l’interrupteur 1 et 2 simultanément pour entrer dans
le mode Strobe. Presser un bouton pour quitter et retourner au mode
précédent.
Système ATR
Le système avancé de régulation de la température (ATR) permet à la lampe
d’ajuster de façon dynamique son niveau d’éclairage en fonction de sa
température interne.
Remplacement des batteries
Les batteries doivent être remplacées en cas suivant : LED blanc clignote
rapidement pendant 2 secondes et la puissance de sortie est réduite.
NOTE : S’assurer que la surface de la lampe est sèche avant de retirer la
batterie pour le remplacement.
Maintenance
Tous les 6 mois, le letage doit être essuyé avec un chion propre et
recouvert d’un lubriant à base de silicone.
Switch 2
Switch 1
DL20
•
Outstanding Waterproof Performance
•
White & Red Dual Output
•
ATR (Advanced Temperature Regulation)
Diving Light
for Underwater Activities
SYSMAX Innovations Co., Ltd.
TEL: +86-20-83862000
FAX: +86-20-83882723
E-mail: [email protected]
Web: www.nitecore.com
Address:Rm2601-06,CentralTower,
No.5XiancunRoad,Tianhe
District,Guangzhou,510623,
Guangdong,China
Thanks for purchasing NITECORE!
Please find us on facebook : NITECORE Flashlight
DL02082019
MadeinChina
Warranty Service
All NITECORE
®
products are warranted for quality. DOA/defective products
can be exchanged for replacement through a local distributor/dealer within
the 15 days of purchase. After 15 days, all defective / malfunctioning
NITECORE
®
products will be repaired free of charge for a period of 60
months from the date of purchase. After 60 months, a limited warranty
applies, covering the cost of labor and maintenance, but not the cost of
accessories or replacement parts.
The warranty is nullied in all of the following situations:
1. The product(s) is/are broken down, reconstructed and/or modied by
unauthorized parties.
2. The product(s) is/are damaged through improper use.
3. The product(s) is/are damaged by leakage of batteries.
For the latest information on NITECORE
®
products and services, please
contact your national NITECORE
®
distributor or send an email to
※ The NITECORE ocial website shall prevail in case of any product data changes.

Loading…
評価
Nitecore DL20 懐中電灯について、製品の評価を入力し、お客様のお考えをお教えてください。この製品とのお客様の経験を共有したいですか、または質問したいですか。ページ下部にコメントを入力してください。このマニュアルの詳細
Nitecore DL20 懐中電灯 に紙のマニュアルがあると便利だと理解しています。 マニュアルは当社 Web サイトからいつでもダウンロードして、ご自身で印刷していただけます。 オリジナルのマニュアルが必要な場合は、Nitecore にお問い合わせいただくことをお勧めします。 オリジナルのマニュアルを提供してくれるかもしれません。 Nitecore DL20 懐中電灯 の別の言語のマニュアルをお探しですか? 当社のホームページでご希望の言語を選択し、モデル番号を検索して入手可能かどうかを確認してください。
仕様
| メーカー | Nitecore |
| モデル | DL20 |
| カテゴリー | 懐中電灯 |
| ファイルの種類 | |
| ファイルサイズ | 4.89 MB |
Nitecore 懐中電灯 のすべてのマニュアル
懐中電灯 のその他のマニュアル
Nitecore DL20 懐中電灯 に関するよくある質問
当社のサポートチームは有用な製品情報とよくある質問への回答を検索します。よくある質問に誤りがある場合は、お問い合わせフォームを介してお知らせください。
デバイスのバッテリーが酸化されていますが、それでも安全に使用できますか? 確認済み
Ja、デバイスはまだ安全に使用できます。まず、酸化電池を取り外します。これを行うために素手で使用しないでください。次に、酢またはレモンジュースに浸した綿棒でバッテリーコンパートメントを清掃します。乾かして新しい電池を入れてください。
役に立った (102) 続きを読む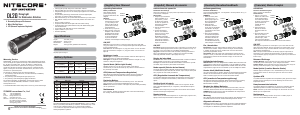

この商品に関する会話に参加する
ここでは、Nitecore DL20 懐中電灯 についての意見を共有できます。 疑問がある場合は、まず説明書をよく読んでください。 マニュアルのご請求は、お問い合わせフォームより承ります。