English Deutsch Français
Thank you for purchasing the AF-S DX Zoom-Nikkor 18-55mm f/3.5-5.6G ED2.
DX Nikkor lenses are specially designed for use with Nikon digital SLR (Nikon
DX format) cameras, such as the D300-Series and D7000. When mounted on
Nikon DX format cameras, the lens’ picture angle is equivalent to approx. 1.5x
focal length in 35mm format. Before using this lens, please read these
instructions and the Notes on Safety Operations.
Notes on Safety Operations
CAUTION
Do not disassemble
Touching the internal parts of the camera or lens could result in injury.
Repairs should be performed only by qualified technicians. Should the
camera or lens break open as the result of a fall or other accident, take the
product to a Nikon-authorized service representative for inspection after
unplugging the product and/or removing the battery.
Turn off immediately in the event of malfunction
Should you notice smoke or an unusual smell coming from the camera or
lens, remove the battery immediately, taking care to avoid burns. Continued
operation could result in injury.
After removing or disconnecting the power source, take the product to a
Nikon-authorized service representative for inspection.
Do not use the camera or lens in the presence of flammable gas
Operating electronic equipment in the presence of flammable gas could
result in an explosion or fire.
Do not look at the sun through the lens or viewfinder
Viewing the sun or other strong light sources through the lens or viewfinder
could cause permanent visual impairment.
Keep out of reach of children
Particular care should be taken to prevent infants from putting the batteries
or other small parts into their mouths.
Observe the following precautions when handling the camera and lens
• Keep the camera and lens unit dry. Failure to do so could result in fire or
electric shock.
• Do not handle or touch the camera or lens unit with wet hands. Failure to
do so could result in electric shock.
• When shooting with back-lighting, do not point the lens at the sun or allow
sunlight to pass directly down the lens as this may cause the camera to
overheat and possibly cause a fire.
• When the lens will not be used for an extended period of time, attach both
front and rear lens caps and store the lens away from direct sunlight.
Failure to do so could result in a fire, as the lens may focus sunlight onto a
flammable object.
Major features
• This lens employs a Silent Wave Motor to drive the focusing mechanism,
making autofocusing smooth, silent and almost instantaneous. The A-M
mode switch 9 is provided to easily select autofocus (A) or manual focus
(M) operations.
• More accurate exposure control is possible because subject distance
information is transferred from the lens to the camera body.
• The use of one aspherical and one ED (extra-low dispersion) lens elements
ensures sharp pictures virtually free of color fringing. Also, by utilizing a 7-
blade diaphragm that produces a nearly circular aperture, out-of-focus
images in front of or behind the subject are rendered as pleasing blurs.
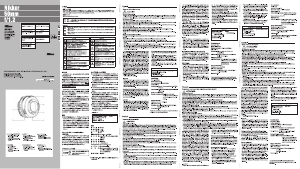
Mounting the lens (Refer to your camera user’s manual.)
1 Turn the camera off.
2 Remove the rear lens cap (Fig. D).
3 Keeping the mounting index 7 on the lens aligned with the mounting mark
on the camera body, rotate the lens counterclockwise until it clicks into
place. Make sure that the mounting index 7 is at the uppermost side.
4 Remove the front lens cap. (Fig. C)
Detaching the lens (Refer to your camera user’s manual.)
Be sure to turn the camera off when removing the lens. Press and hold the
lens-release button while turning the lens clockwise to detach.
Using lens hood HB-45
1
* (Fig. B) *Optional. Only available in black.
■ Attaching the hood
Attach the lens hood 1 while depressing the lens hood attachment buttons
2. To store the lens hood 1, attach it in the reverse position.
■ Detaching the hood
Detach the lens hood 1 while holding the lens hood attachment buttons 2.
Focusing, zooming, and depth of field
Before focusing, turn the zoom ring 4 to change the focal
length until the desired composition is framed in the
viewfinder. Turn the zoom ring 4 clockwise as viewed
from the camera side to take telephoto pictures and
counterclockwise to take wide-angle pictures.
If your camera has a depth of field preview (stop-down)
button or lever, depth of field can be observed while
looking through the camera viewfinder. See the user’s manual of your camera
body for more details.
Focusing (Fig. A)
■ Autofocus mode: Set the camera’s focus mode to AF and set the lens’ A-M
mode switch 9 to [A]. Autofocus is provided while lightly pressing the shutter
release button.
Be careful not to touch the focus ring 3 when it is turning during autofocus
operation.
■ Manual focus mode: Set the lens’ A-M mode switch 9 to [M]. Turn the
focus ring 3 manually to focus. Shooting is possible when camera’s focus
mode is set to either AF or M.
Setting the aperture
Set the aperture on the camera body.
Variable maximum apertures
Zooming the lens from 18mm to 55mm decreases the maximum aperture by
1-1/3 of an f/stop. However, there is no need to adjust the aperture for correct
exposures because the camera automatically compensates for this variation.
The built-in flash and vignetting
• The built-in flash cannot be used over distances of less than 0.6 m (2.0 ft).
• To prevent vignetting, do not use the lens hood.
* Vignetting is the darkening of the corners around the image that occurs
when the light emitted by the flash is obstructed by the lens hood, or lens
barrel, depending on the shooting distance.
Lens care
• Be careful not to soil or damage the CPU contacts 8.
• Clean the lens surfaces with a blower brush. To remove dirt and smudges, use
a soft, clean cotton cloth or lens tissue moistened with ethanol (alcohol) or lens
cleaner. Wipe in a circular motion from center to outer edge, taking care not to
leave traces or touch other parts of the lens.
• Never use thinner or benzene to clean the lens, as this might damage it,
result in a fire or cause health problems.
• To protect the front lens element, an NC filter is available. A lens hood 1
also helps protect the front of the lens.
• When storing the lens in its flexible lens pouch, attach both the front and rear
lens caps. The lens can also be stored when the lens hood 1 is attached in
the reverse position.
• Do not hold the lens hood 1 while the lens is attached to a camera.
• When the lens will not be used for a long time, store it in a cool, dry place to
prevent mold. Also store the lens away from direct sunlight or chemicals
such as camphor or naphthalene.
• Do not get water on the lens or drop it in water as this will cause it to rust and
malfunction.
• Reinforced plastic is used for certain parts of the lens. To avoid damage,
never leave the lens in an excessively hot place.
Standard accessories
• 52mm snap-on front lens cap LC-52
Optional accessories
• 52mm screw-in filters • Rear lens cap • Flexible lens pouch CL-0815
• Lens hood HB-45* *Only available in black.
Incompatible accessories
• Teleconverters (all models)
• Auto Ring BR-4 and all models of Auto Extension Ring PK, K Ring and
Bellows focusing attachment.
• Attachment Ring SX-1
Other accessories might not be suitable for use with this lens. For details,
check your accessories user’s manual.
Vielen Dank für Ihr Vertrauen in das AF-S DX Zoom-Nikkor 18-55mm f/3,5-5.6G ED2. DX
Nikkor-Objektive sind speziell für den Gebrauch mit Nikon Digital-SLR-Kameras (Nikon DX-
Format) ausgelegt, wie etwa der Modelle der D300-Serie sowie Modell der D7000.
Bei Anbringen an Kameras im Nikon DX-Format entspricht der Bildwinkel des Objektivs ca.
dem 1,5-Fachen der Brennweite im 35-mm-Format. Machen Sie sich bitte vor dem Einsatz
dieses Objektivs mit dem Inhalt dieser Bedienungsanleitung und den Hinweisen für sicheren
Betrieb vertraut.
Hinweise für sicheren Betrieb
ACHTUNG
Keinesfalls zerlegen.
Beim Berühren der Innenteile von Kamera oder Objektiv droht Verletzungsgefahr.
Überlassen Sie Reparaturen unbedingt ausschließlich qualifizierten Technikern. Kommt es
durch einen heftigen Stoß (z.B. Fall auf den Boden) zu einem Bruch von Kamera oder
Objektiv, so trennen Sie zunächst das Produkt vom Stromnetz bzw. entnehmen die
Batterie(n) und geben es dann an eine autorisierte Nikon-Servicestelle zur Überprüfung ab.
Bei einer Störung sofort die Stromversorgung ausschalten.
Bei Entwicklung von Rauch oder ungewöhnlichem Geruch durch Kamera oder Objektiv
entnehmen Sie sofort die Batterie(n); dabei vorsichtig vorgehen, denn es besteht
Verbrennungsgefahr. Bei einem Weiterbetrieb unter diesen Umständen droht
Verletzungsgefahr.
Nach dem Abtrennen von der Stromversorgung geben Sie das Gerät an eine autorisierte
Nikon-Servicestelle zur Überprüfung ab.
Kamera oder Objektiv keinesfalls bei Vorhandensein von brennbarem Gas einsetzen.
Wird elektronisches Gerät bei brennbarem Gas betrieben, so droht u.U. Explosions- oder
Brandgefahr.
Keinesfalls durch Objektiv oder Sucher in die Sonne blicken.
Beim Betrachten der Sonne oder anderer starker Lichtquellen durch Objektiv oder Sucher
droht eine permanente Schädigung des Sehvermögens.
Dem Zugriff von Kindern entziehen.
Es ist unbedingt dafür zu sorgen, dass Kleinkinder keine Batterien oder andere Kleinteile in
den Mund nehmen können.
Beim Umgang mit Kamera und Objektiv unbedingt die folgenden Vorsichtmaßnahmen
beachten:
• Schützen Sie die Kamera und das Objektiv vor Feuchtigkeit. Andernfalls droht Brand-
oder Stromschlaggefahr.
• Handhaben oder berühren Sie die Kamera bzw. das Objektiv keinesfalls mit nassen
Händen. Andernfalls droht Stromschlaggefahr.
• Bei Gegenlichtaufnahmen nicht das Objektiv gegen die Sonne richten oder das
Sonnenlicht direkt durch das Objektiv eintreten lassen. Dies könnte eine Überhitzung der
Kamera verursachen und ein Brand könnte die Folge sein.
• Vor einem längeren Nichtgebrauch des Objektivs bringen Sie den vorderen und hinteren
Deckel an und bewahren das Objektiv geschützt vor direkter Sonnenlichteinwirkung auf.
Andernfalls droht Brandgefahr wegen möglicher Fokussierung von Sonnenlicht durch das
Objektiv auf brennbare Gegenstände.
Hauptmerkmale
• Der Silent Wave Motor im Objektiv steuert den Fokussiermechanismus und sorgt so für
stufenlosen, leisen und praktisch verzögerungsfreien Autofokus-Betrieb. Der Fokus-Modusschalter
(A-M) 9 dient zur einfachen Wahl von Autofokus (A) oder manueller Scharfeinstellung (M).
• Eine präzisere Belichtungssteuerung ist möglich, denn die Objektdistanzdaten werden vom
Objektiv zum Kameragehäuse übertragen.
• Der Einsatz einer asphärischer und einer ED-Linsen (mit besonders geringer Dispersion)
gewährleistet scharfe, nahezu farbsaumfreie Bilder. Sieben Blendenlamellen sorgen für eine
nahezu kreisrunde Blendenöffnung, so daß außerhalb des Schärfenbereichs vor und hinter
dem Motiv liegende Elemente in ansprechende Unschärfe getaucht werden.
Anbringen des Objektivs (Siehe hierzu das Benutzerhandbuch der Kamera.)
1 Schalten Sie die Stromversorgung der Kamera aus.
2 Nehmen Sie den hinteren Objektivdeckel ab (Abb. D).
3 Fluchten Sie die Montage-Markierungen 7 an Objektiv und Kameragehäuse und drehen
Sie das Objektiv entgegen dem Uhrzeigersinn, bis es hörbar einrastet. Sorgen Sie
unbedingt dafür, dass sich die Montage-Markierung 7 ganz oben befindet.
4 Nehmen Sie den vorderen Objektivdeckel ab. (Abb. C)
Abnehmen des Objektivs (Siehe hierzu das Benutzerhandbuch der Kamera.)
Beim Abnehmen des Objektivs muss die Kamera unbedingt ausgeschaltet sein. Halten Sie die
Objektiv-Freigabetaste gedrückt und drehen Sie das Objektiv im Uhrzeigersinn.
Verwendung der Gegenlichtblende HB-45
1
* (Abb. B)
*Sonderzubehör: Nur in Schwarz lieferbar.
■ Anbringen der Gegenlichtblende
Bringen Sie die Gegenlichtblende
1
an, indem Sie die Gegenlichtblende-Montagetasten
2
drücken. Zum Verstauen bringen Sie die Gegenlichtblende
1
in der umgekehrten Position an.
■ Abnehmen der Gegenlichtblende
Nehmen Sie die Gegenlichtblende 1 ab, indem Sie die Gegenlichtblende-Montagetasten 2
gedrückt halten.
Scharfeinstellung, Zoomen und Schärfentiefe
Vor der Scharfeinstellung verstellen Sie mit dem Zoomring 4 die
Brennweite so weit, bis die gewünschte Bildkomposition im Sucher
dargestellt ist. Drehen Sie den Zoomring 4 im Uhrzeigersinn (gesehen
von der Kameraseite aus), um Teleaufnahmen zu machen, und entgegen
dem Uhrzeigersinn für Weitwinkelaufnahmen. Hat Ihre Kamera eine Taste
oder einen Hebel für Schärfentiefe-Voransicht (Abblenden), so lässt sich
die Schärfentiefe beim Blicken durch den Kamerasucher beurteilen.
Näheres hierzu finden Sie im Benutzerhandbuch der Kamera.
Scharfeinstellung (Abb. A)
■ Autofokus-Modus: Stellen Sie die Kamera auf AF ein und den Fokus-Modusschalter (A-M) 9
am Objektiv auf [A]. Durch Antippen des Auslösers wird der Autofokus aktiviert.
Beim Drehen während des Autofokus-Betriebs darf der Einstellring 3 nicht berührt werden.
■ Manuelle Scharfeinstellung: Stellen Sie den Fokus-Modusschalter A-M 9 auf [M]. Drehen
Sie den Einstellring 3 mit der Hand zum Fokussieren. Aufnahmen sind möglich, wenn der
Autofokus-Modus der Kamera auf AF oder [M] eingestellt ist.
Blendeneinstellung
Stellen Sie die Blende an der Kamera ein.
Variable maximale Blenden
Durch Zoomen des Objektivs von 18 bis 55 mm wird die maximale Blende um 1-1/3 Stufe
abgeblendet. Dies spielt für eine korrekte Belichtung jedoch keine Rolle, weil die Kamera
automatisch jede Verstellung kompensiert.
Integriertes Blitzgerät und Abschattung
• Das integrierte Blitzgerät kann nicht für Entfernungen von unter 0,6 m eingesetzt werden.
• Verwenden Sie beim Fotografieren mit Einsatz des integrierten Blitzgeräts keine
Gegenlichtblende.
* Unter Vignettierung versteht man die Abdunkelung der Bildecken, wenn das Blitzlicht von der
Gegenlichtblende oder, je nach Aufnahmedistanz, vom Objektivtubus verdeckt wird.
Pflege des Objektivs
• Halten Sie die CPU-Kontakte 8 peinlich sauber, und schützen Sie sie vor Beschädigung!
• Säubern Sie Glasflächen mit einem Blasepinsel. Staub und Flecken entfernen Sie mit einem
sauberen, weichen Baumwolltuch oder Optik-Reinigungspapier, das Sie mit éthanol
(Alkohol) oder Optik-Reinigungsflüssigkeit anfeuchten. Wischen Sie in kreisförmigen
Bewegungen von der Mitte nach außen, ohne daß Wischspuren zurückbleiben.
• Verwenden Sie keinesfalls Verdünnung oder Benzin zur Reinigung, da dieses zu
Beschädigungen führen, Gesundheitsschäden verursachen oder ein Feuer auslösen könnte.
• Zum Schutz der Vorderlinse ist ein Filter NC erhältlich. Die Gegenlichtblende 1 wirkt als
zusätzlicher Frontlinsenschutz.
• Beim Verstauen des Objektivs in seinem flexiblen Etui müssen vorderer und hinterer Deckel
aufgesetzt sein. Das Objektiv lässt sich auch dann verstauen, wenn die die
Gegenlichtblende 1 in der umgekehrten Position angebracht ist.
• Halten Sie die Kamera nicht an der Gegenlichtblende 1, wenn das Objektiv an der Kamera
angebracht ist.
• Bei längerer Nichtbenutzung sollte das Objektiv an einem kühlen, trockenen Ort aufbewahrt
werden. Halten Sie das Objektiv von direkter Sonneneinstrahlung oder Chemikalien wie
Kampfer oder Naphthalin fern.
• Halten Sie das Objektiv von Wasser fern, das zur Korrosion und zu Betriebsstörungen führen kann.
• Einige Teile des Objektivs bestehen aus verstärktem Kunststoff. Lassen Sie das Objektiv
deshalb nie an übermäßig heißen Orten zurück!
Serienmäßiges Zubehör
• Aufsteckbarer 52-mm-Frontobjektivdeckel LC-52
Sonderzubehör
• 52-mm-Einschraubfilter • Objektivrückdeckel • Objektivbeutel CL-0815
• Gegenlichtblende HB-45* *Nur in Schwarz lieferbar.
Nicht geeignetes Zubehör
• Telekonverter (alle Modelle)
• Auto-Ring BR-4 und alle Modelle von Auto-Zwischenring PK, Ring K und Balgenvorsatz.
• Anschlussring SX-1
Anderes Zubehör ist möglichcherweise für bestimmte Kameras nicht geeignet. Lesen Sie
sorgfältig das Benutzerhandbuch zu Ihrem Zubehör.
Technische Daten
Objektivtyp: AF-S DX Zoom-Nikkor-Objektiv Typ G mit integrierter CPU und Nikon-
Bajonettfassung (speziell ausgelegt für den Gebrauch mit Nikon Digital-
SLR-Kameras – Nikon DX-Format)
Brennweite: 18–55 mm
Maximale Blendenöffnung: f/3,5 – 5,6
Objektivaufbau: 7 Elemente in 5 Linsengruppen (1 ED-Element und 1 asphärisches
Element)
Bildwinkel: 76° – 28°50´
Brennweitenskala: 18, 24, 35, 45, 55 mm
Entfernungsdaten: Werden an Kameras übertragen
Zoomen: Manuell über separaten Zoomring
Scharfeinstellung: Autofokus mittels Silent Wave Motor; manuell über separaten Einstellring
Kürzeste Aufnahmedistanz: 0,28 m von der Sensorebene gemessen, bei allen Zoompositionen
Blende: Irisblende mit 7 gerundeten Lamellen
Blendenart: Vollautomatisch
Blendenbereich: f/3,5 bis f/22 (bei 18 mm), f/5,6 bis f/38 (bei 55 mm)
Belichtungsmessung: Offenblendenmessung
Befestigungsgröße: 52 mm (P = 0,75mm)
Abmessungen: Ca. 70,5 mm Durchm. x 74 mm (zum Objetivmontageflansch der Kamera)
Gewicht: Ca. 205 g
Änderungen von technischen Daten und Design durch den Hersteller vorbehalten.
Merci d’avoir porté votre choix sur l’objectif AF-S DX Zoom-Nikkor 18-55mm f/3,5-5,6G
ED2. Les objectifs Nikkor DX sont conçus spécialement pour une utilisation avec les
reflex numériques (format DX Nikon), tels la série D300 et D7000.
Lorsqu’il est monté sur des appareils au format DX Nikon, l’angle d’image de l’objectif est
environ équivalent à 1,5x la focale au format 35mm. Avant d’utiliser cet objectif, veuillez
lire ces instructions et les remarques sur les utilisations en toute sécurité.
Remarques concernant une utilisation en toute sécurité
ATTENTION
Ne pas démonter
Le fait de toucher aux pièces internes de l’appareil ou de l’objectif pourrait entraîner des
blessures. Les réparations doivent être effectuées par des techniciens qualifiés. Si
l’appareil ou l’objectif est cassé suite à une chute ou un autre accident, apportez le produit
dans un centre de service agréé Nikon pour le faire vérifier après avoir débranché le
produit et retiré les piles.
En cas de dysfonctionnement, éteignez l’appareil immédiatement
Si vous remarquez de la fumée ou une odeur inhabituelle se dégageant de l’appareil photo
ou de l’objectif, retirez immédiatement les piles, en prenant soin de ne pas vous brûler.
Continuer d’utiliser son matériel peut entraîner des blessures. Après avoir retiré ou
débranché la source d’alimentation, confiez le produit à un centre de service agréé Nikon
pour le faire vérifier.
N’utilisez pas l’appareil photo ou l’objectif en présence de gaz inflammable
L’utilisation de matériel électronique en présence de gaz inflammable risquerait de
provoquer une explosion ou un incendie.
Ne regardez pas le soleil dans l’objectif ou le viseur
Regarder le soleil ou toute autre source lumineuse violente dans l’objectif ou le viseur peut
provoquer de graves lésions oculaires irréversibles.
Tenir hors de portée des enfants
Faites extrêmement attention à ce que les enfants ne mettent pas à la bouche les piles ou
d’autres petites pièces.
Observez les précautions suivantes lorsque vous manipulez l’appareil et l’objectif
• Maintenez l’appareil photo et l’objectif au sec. Le nonrespect de cette précaution peut
provoquer un incendie ou une électrocution.
• Ne manipulez pas et ne touchez pas l’appareil photo ou l’objectif avec les mains humides.
Le non-respect de cette précaution peut provoquer une électrocution.
• Lors d’une prise de vue à contre-jour, ne dirigez pas l’objectif vers le soleil et évitez que
les rayons du soleil pénètrent dans l’objectif ; l’appareil photo pourrait chauffer à l’excès,
ce qui risquerait de provoquer un incendie.
• Lorsque vous n’utilisez pas l’objectif pendant une période prolongée, fixez les bouchons
avant et arrière, et rangez l’objectif à l’abri de la lumière directe du soleil. Le non-respect
de cette précaution peut provoquer un incendie, car l’objectif peut concentrer la lumière
du soleil sur un objet inflammable.
Principales caractéristiques
• Cet objectif utilise un moteur à ondes silencieux pour entraîner le mécanisme de mise au
point, permettant un autofocus régulier, silencieux et presque instantané. Le commutateur
de mode A-M 9 sert à sélectionner facilement les modes autofocus (A) et mise au point
manuelle (M).
• Un contrôle d’exposition plus précis est possible, parce que l’information de distance au
sujet est transférée de l’objectif au boîtier.
• L’utilisation d’un élément asphérisque et d’un élément ED (dispersion extra basse) assure
des images nettes virtuellement exemptes de frangeage couleur. Et l’emploi d’un
diaphragme à 7 lames produisant une ouverture quasi circulaire estompe agréablement les
images floues à l’avant ou à l’arrière du sujet.
Fixation de l’objectif (Reportez-vous au manuel d’utilisation de votre appareil.)
1 Eteignez l’appareil photo.
2 Otez le capuchon d’objectif arrière (Fig. D).
3
En maintenant le repère de montage
7
de l’objectif aligné avec le repère de montage du boîtier,
tournez l’objectif dans le sens inverse des aiguilles d’une montre jusqu’à ce qu’il se mette en
place avec un déclic. Assurez-vous que le repère de montage
7
est dirigé vers le haut.
4 Otez le capuchon d’objectif avant. (Fig. C)
Démontage de l’objectif (Reportez-vous au manuel d’utilisation de votre appareil.)
Assurez-vous d’éteindre l’appareil photo lorsque vous ôtez l’objectif. Appuyez sur le bouton
de libération de l’objectif et maintenez-le enfoncé tout en tournant l’objectif dans le sens des
aiguilles d’une montre.
Utilisation du parasoleil HB-45
1
* (Fig. B) * Optionnel. Disponible uniquement en noir.
■ Fixation du parasoleil
Fixez le parasoleil 1 tout en appuyant sur les boutons de fixation du parasoleil 2. Pour
ranger l’objectif, fixez le parasoleil 1 à l’envers.
■ Démontage du parasoleil
Démontez le parasoleil 1 tout en maintenant les boutons de fixation du parasoleil 2.
Mise au point, cadrage au zoom et profondeur de champ
Avant de mettre au point, tournez la bague de zoom 4 pour changer la
focale jusqu’à ce que la composition souhaitée soit cadrée dans le viseur.
Tournez la bague de zoom 4 dans le sens des aiguilles d’une montre, vu
du côté de l’appareil, pour prendre des photos au téléobjectif et dans le
sens inverse des aiguilles d’une montre pour prendre des photos grand-
angle. Si votre appareil dispose d’un bouton ou d’un levier de
prévisualisation du champ (ouverture réelle), vous pouvez observer la
profondeur du champ en regardant à travers le viseur de l’appareil. Voyez
le manuel d’utilisation de votre boîtier pour plus de détails.
Mise au point (Fig. A)
■ Mode autofocus: Réglez le mode de mise au point de l’appareil sur AF et le commutateur de
mode A-M 9 de l’objectif sur [A]. L‘autofocus se déclenche en pressant légèrement le déclencheur.
Veillez à ne pas toucher la bague de mise au point 3 lorsqu’elle tourne pendant le
fonctionnement de l’autofocus.
■ Mode de mise au point manuelle: Réglez le commutateur de mode A-M 9 de l’objectif sur
[M]. Tournez manuellement la bague de mise au point 3 pour mettre au point. La prise de vue
est possible lorsque le mode de mise au point de l’appareil est réglé soit sur AF soit sur [M].
Réglage de l’ouverture
Réglez l’ouverture sur le boîtier.
Ouvertures maximales variables
Le fait de zoomer avec l’objectif de 18mm à 55mm diminue l’ouverture maximale de 1-1/3 de
valeur. Cependant, il n’est pas nécessaire d’ajuster l’ouverture pour une exposition correcte
car l’appareil compense automatiquement cette variation.
Flash intégré et vignettage
• Il est impossible d’utiliser le flash intégré à des distances inférieures à 0,6 m.
•Pour éviter le vignetage, n’utilisez pas le parasoleil.
* Le vignettage est l’assombrissement des coins de l’image qui se produit lorsque la lumière
émise par le flash est retenue par le parasoleil ou la monture de l’objectif en fonction de la
distance de prise de vue.
Soin de l’objectif
• Veiller à ne pas salir ni endommager les contacts CPU 8.
• Nettoyer la surface de l’objectif avec un pinceau soufflant. Pour enlever les poussières ou les
traces, utiliser de préférence un tissu de coton doux, ou un tissu optique, légèrement humidifié
avec de l’alcool éthylique (éthanol). Essuyer en mouvement circulaire partant du centre.
• Ne jamais employer de solvant ou de benzènes qui pourrait endommager l’objectif, prendre
feu ou nuire à la santé.
• Pour protéger la lentille de l’objectif un filtre NC est disponible. Un paresoleil 1 assure
également une bonne protection contre les chocs.
•
Lorsque vous rangez l’objectif dans son sac souple, fixez les deux capuchons avant et arrière de
l’objectif. L’objectif peut aussi être rangé lorsque le paresoleil
1
est fixé en position inversée.
• Ne tenez pas le paresoleil 1 lorsque l’objectif est fixé sur l’appareil.
• En cas d’inutilisation pour une longue période, entreposer le matériel dans un endroit frais,
sec et aéré pour éviter les moisissures. Tenir le matériel éloigné des sources de lumière, et
des produits chimiques (camphre, naphtaline, etc.).
• Eviter les projections d’eau ainsi que l’immersion, qui peut provoquer la rouille et des
dommages irréparables.
• Divers matériaux de synthèse sont utilisés dans la fabrication. Pour éviter tout problème, ne
pas soumettre l’objectif à de fortes chaleurs.
Accessoires fournis
• Bouchon avant d’objectif diamètre 52 mm LC-52
Accessoires en option
• Filtres à visser 52mm • Bouchon arrière • Sac souple pour objectif CL-0815
• Parasoleil HB-45* * Disponible uniquement en noir.
Accessoires incompatibles
• Téléconvertisseur (tous les modèles) • La bague auto BR-4 et tous les modèles de bague
d’auto-rallonge PK, les bagues K et les accessoires de mise au point soufflet. • Bague de
fixation SX-1
L’emploi d’autres accessoires peut ne pas être adapté avec cet objectif. Lisez attentivement le
manuel d’utilisation de l’accessoire pour les détails.
Caractéristiques
Type d’objectif: Zoom-Nikkor DX AF-S de type G avec processeur et monture baïonnette
Nikon (Spécialement conçus pour être utilisés sur des reflex numériques
Nikon – format DX Nikon)
Focale: 18 – 55 mm
Ouverture maximale: f/3,5 – 5,6
Construction optique: 7 éléments en 5 groupes (1 lentille ED et 1 lentille asphérique)
Champ angulaire: 76° – 28°50´
Focales: 18, 24, 35, 45, 55 mm
Informations sur la distance:
A l’appareil
Zooming: Manuel avec bague de zoom séparée
Mise au point: Autofocus utilisant un moteur à ondes silencieux par bague de mise au
point séparée
Distance de mise au
point minimale: 0,28 m à partir du plan focal quel que soit le réglage du zoom
Nb. de lamelles du
diaphragme: 7 (circulaires)
Diaphragme: Entièrement automatique
Plage des ouvertures: f/3,5 à f/22 (à 18 mm), f/5,6 à f/38 (à 55 mm)
Mesure de l’exposition: Par la méthode à pleine ouverture
Taille des accessoires: 52 mm (P = 0,75 mm)
Dimensions:
Env. dia. 70,5 mm x rallonge 74 mm (de la bride de montage d’objectif de l’appareil)
Poids: Env. 205 g
Les caractéristiques et le dessin sont susceptibles d’être modifiés sans préavis ni obligation
de la part du constructeur.
このたびはDXニッコールレンズをお買い上げいただきありがとうございます。このレンズは、
ニコンDXフォーマットのニコンデジタル一眼レフカメラ(D300シリーズ、D7000など)専
用です。ニコンDXフォーマットでの撮影画角は、35mm判換算で焦点距離の約1.5倍の焦点
距離に相当する画角になります。ご使用の前に、この「使用説明書」をよくお読みの上、正し
くお使いください。また、「安全上のご注意」を必ずお読みください。
主な特長
●
レンズ内超音波モーター(サイレント・ウェーブ・モーター)を採用し静かなAF(オート
フォーカス)撮影が可能です。また、A-M切り換えスイッチ9によりAF(オートフォーカ
ス)撮影およびMF(マニュアルフォーカス)撮影ができます。
●
被写体までの距離情報をカメラ側に伝達する機能を備え、より的確な露出制御を実現します。
●
ニコン独自のED(特殊低分散)ガラスによる色収差の補正とともに、非球面レンズや良好
なボケ味を再現する円形絞りの採用により優れた光学性能、描写性能を発揮します。
カメラへの取り付け方(カメラの使用説明書もご覧ください)
1 カメラの電源スイッチをOFFにします。
2 レンズの裏ぶたを取り外します(図D)
3 レンズとカメラのレンズ着脱指標7を合わせ、反時計回りにカチッと音がするまでレンズ
を回します。このとき、レンズの着脱指標7が真上にきます。
4 レンズキャップを取り外します。(図C)
カメラからレンズの取り外し方(カメラの使用説明書もご覧ください)
レンズを取り外すには、カメラの電源スイッチをOFFにし、レンズ取り外しボタンを押しなが
ら時計回りにレンズを回します。
フードHB-451の取り付け、取り外し(図B)
(
注:フードは別売で、ブラックのみです。)
■取り付け方:フード着脱ボタン2を押した状態で取り付け、ボタン2から指を離します。
収納時は、フード1を逆向きにして取り付けることができます。
■取り外し方:フード着脱ボタン2を押した状態で取り外します。
ズーミングと被写界深度
撮影を行う場合は、ズームリング4を回転させ(焦点距離が変化しま
す)、構図を決めてからピント合わせを行ってください。ズームリング
4をカメラ側から見て時計回りに回すと写る範囲(画角)は狭く被写
体は大きくなり、反時計回りに回すと写る範囲(画角)が広く被写体
は小さくなります。
プレビュー(絞り込み)機構を持つカメラでは、撮影前に被写界深度
を確認できます。詳しくは、カメラの使用説明書をご覧ください。
ピント合わせの方法(図A)
■オートフォーカス撮影:カメラのフォーカスモードをAFにセットし、レンズのA-M切り換
えスイッチ9を[A]にセットしてください。シャッターボタンを半押してピントを合わせ撮
影します。
オートフォーカス撮影ではフォーカスリング3が回転しますので、フォーカスリング3に
触れないように注意してください。
■マニュアルフォーカス撮影:レンズのA-M切り換えスイッチ9を[M]にセットします。フォ
ーカスリング3を回転させてピントを合わせ撮影します。このときカメラ側のフォーカスモー
ドはAFでもMでもマニュアルフォーカス撮影ができます。
※クローズアップレンズを装着した場合は、マニュアルフォーカスでピントを合わせて撮影し
てください。
絞り値の設定
絞り値を設定する場合は、カメラで設定してください。
開放F値の変化
このレンズはズーミングにより、開放F値が最大1
1
/
3
段変化します。ただし、露出を決める際
に、F値の変化量はカメラが自動的に補正しますので考慮する必要はありません。
カメラの内蔵フラッシュ使用時のご注意
●
撮影距離0.6m以上で使用してください。
●
ケラレを防止するために、レンズのフードは取り外して使用してください。
※カメラの内蔵フラッシュのケラレとは、フラッシュの光がレンズのフードや撮影距離によっ
てはレンズの先端でさえぎられて影になり、写真に映り込む現象です。
レンズのお手入れと取り扱い上のご注意
●
レンズのCPU信号接点8は汚さないようにご注意ください。
●
レンズ面の清掃は、ホコリを拭う程度にしてください。指紋がついたときは、柔らかい清潔な
木綿の布に無水アルコール(エタノール)または市販のレンズクリーナーを少量湿らせ、レン
ズの中心から外周へ渦巻状に、拭きムラ、拭き残りのないように注意して拭いてください。
●
シンナーやベンジンなどの有機溶剤は絶対に使用しないでください。
●
レンズ表面の汚れや傷を防ぐためには、NCフィルターをお使いいただけます。また、レン
ズフード1も役立ちます。
●
レンズをソフトケースに入れるときは、必ず、レンズキャップと裏ぶたを取り付けてくださ
い。なお、フード1を逆さ向きにしてレンズに取り付けた状態でも収納可能です。
●
フード1を持ってカメラを持ち上げたりしないでください。
●
レンズを長期間使用しないときは、カビやサビを防ぐために、高温多湿のところを避けて風
通しのよい場所に保管してください。また、直射日光のあたるところ、ナフタリンや樟脳の
あるところも避けてください。
●
レンズを水に濡らすと、部品がサビつくなどして故障の原因となりますのでご注意ください。
●
ストーブの前など、高温になるところに置かないでください。極端に温度が高くなると、外
観の一部に使用している強化プラスチックが変形することがあります。
付属アクセサリー
●
52mmスプリング式レンズキャップ LC-52
別売アクセサリー
●
52mmネジ込み式フィルター
●
裏ぶた
●
ソフトケース CL-0815
●
フード HB-45(注:フードはブラックのみです。)
使用できないアクセサリー
●
テレコンバーター:全種類
●
オート接写リング:PKリング全種類
●
Kリング:全種類
●
オートリング:BR-4
●
ベローズアタッチメント:全種類
●
アタッチメントリング SX-1
※その他のアクセサリーでも、使用できない場合があります。アクセサリーの使用説明書をご
確認ください。
仕 様
型式: ニコンFマウントCPU内蔵Gタイプ、AF-SDXニッコールズームレンズ
(ニコンデジタル一眼レフカメラ[ニコンDXフォーマット]専用)
焦点距離: 18mm― 55mm
最大口径比: 1:3.5― 5.6
レンズ構成: 5群7枚(EDレンズ1枚、非球面レンズ1枚)
画角: 76°―28°50′
焦点距離目盛: 18、24、35、45、55mm
撮影距離情報: カメラへの撮影距離情報出力可能
ズーミング: ズームリングによる回転式
ピント合わせ: 超音波モーターによるオートフォーカス、マニュアルフォーカス可能
最短撮影距離: 撮像面から0.28m(ズーム全域)
絞り羽根枚数: 7枚(円形絞り)
絞り方式: 自動絞り
絞りの範囲: 焦点距離18mm時 f 3.5―22、55mm時 f 5.6―38
測光方式: 開放測光
アタッチメントサイズ
: 52mm(P=0.75mm)
大きさ: 約70.5(最大径)× 74mm(バヨネットマウント基準面からレンズ先
端まで)
質量: 約205g
●
仕様、外観の一部を、改善のため予告なく変更することがあります。
日本語


この商品に関する会話に参加する
ここでは、ニコン Nikkor AF-S DX Zoom-Nikkor 18-55mm f/3.5-5.6G ED II カメラレンズ についての意見を共有できます。 疑問がある場合は、まず説明書をよく読んでください。 マニュアルのご請求は、お問い合わせフォームより承ります。