4. Press S3 button, the minute digits will blink.
Press S1 button to increase the digits by one
unit or press S2 button to decrease the digits by
one unit. Holding down either button will speed
up the process.
5. Press S3 button, the alarm frequency setting
will blink. Press S1 button or S2 button to cycle
forward or backward respectively the alarm
frequency setting to be selected (DAILY, WEEK-
DAYS, WEEKENDS, SUN…SAT WKLY(Sunday
through Saturday weekly)).
6. When nished making all the settings, press S4
button to conrm.
NOTE: The alarm time is displayed in the same
time format as in NORMAL TIME mode.
NOTE: The alarm will automatically be activated
after being set.
NOTE: Both ALARM 1 and ALARM 2 function in
accordance with NORMAL TIME (TIME-1) only.
TO TURN ON/OFF THE ALARM:
1. Press S3 button to select ALARM mode.
2. Press S1 button to toggle between ALARM 1
and ALARM 2.
3. Press S2 button to turn on the alarm, the alarm
frequency setting will appear.
4. Press S2 button again to turn off the alarm, the
message “OFF” message will be displayed.
WHEN AN ALARM OR HOURLY CHIME GOES OFF:
A tune will be emitted by the hour when the hourly
chime function is activated.
A 20-second alarm tune will be emitted and the
backlight will ash at the designated time when
the alarm is activated. To stop the tune, press
any button.
If the alarm tune is done without any user interrup-
tion, the watch will automatically enter a snooze
mode. The alarm will go off again after 5 minutes
but for only once.
TO SET THE FORIGN TIME AND CALENDAR:
1. Press S3 button to select TIME 2 mode.
2. Press and hold S4 button for approximately 4
seconds, the message “SET TIME-2” will be
displayed and the year digits will blink. Press
S1 button to increase the digits by one unit or
press S2 button to decrease the digits by one
unit. Holding down either button will speed up
the process.
3. Press S3 button the month digits will blink.
Press S1 button to increase the digits by one
unit or press S2 button to decrease the digits by
one unit. Holding down either button will speed
up the process.
4. Press S3 button, the date digits will blink. Press
S1 button to increase the digits by one unit or
press S2 button to decrease the digits by one
unit. Holding down either button will speed up
the process.
5. Press S3 button, the hour digits (including
A.M./P.M. for 12-hour format) will blink. Press
S1 button to increase the digits by one unit or
press S2 button to decrease the digits by one
unit. Holding down either button will speed up
the process.
6. Press S3 button, the minute digits will blink.
Press S1 button to increase the digits by one
unit or press S2 button to decrease the digits by
one unit. Holding down either button will speed
up the process.
7. When nished making all the settings, press S4
button to conrm.
NOTE: In FOREIGN TIME mode, only the year,
month, date, hour and minute are open to setting.
All other settings are synchronized between NOR-
MAL TIME mode and FOREIGN TIME mode.
TO USE THE BACKLIGHT:
Press S5 button to turn on the backlight for ap-
proximately 3 seconds.
To reduce carbon foot print, these
SHARK instructions are printed with
soy inks on recycled paper.
ENGLISH
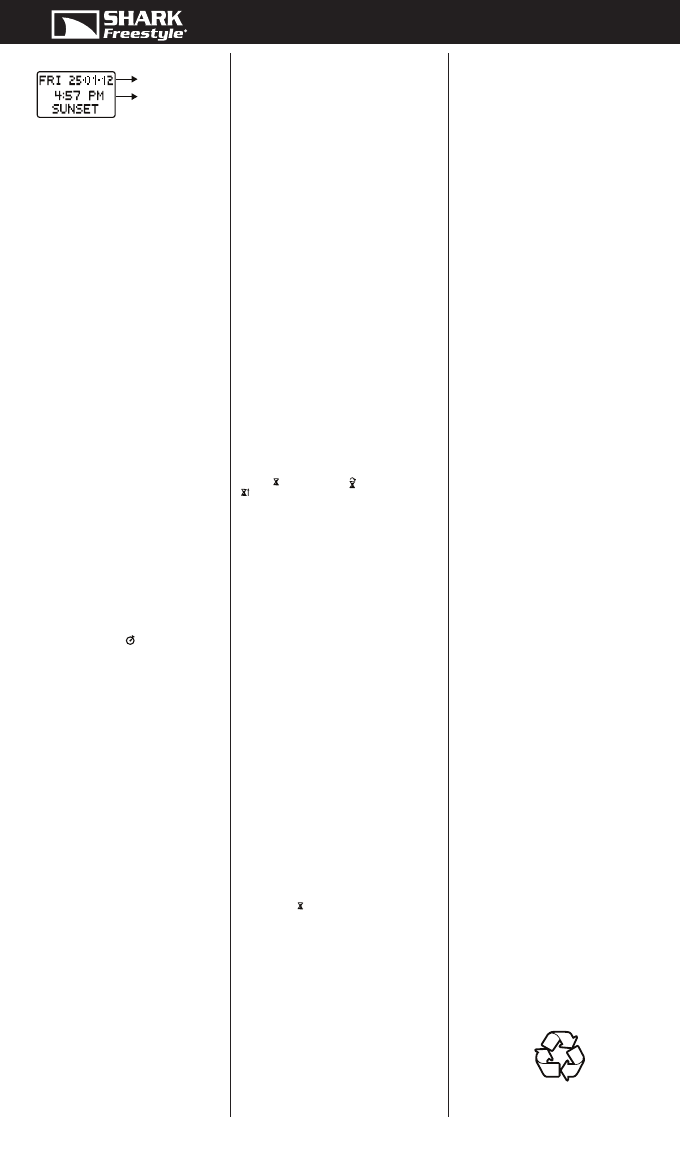
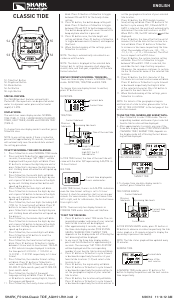
SUNSET TIME:
In SUNSET TIME mode, Press S1 button or S2
button to display the previous and the next sunset
time respectively.
NOTE: In all of the three data display modes, you
can press and hold S1 button or S2 button until the
“SCAN” message appears to initiate date scanning
in the forward or backward direction respectively.
Release either button when the desired date is
displayed.
After abandoning the date scanning procedure,
while the “SCAN” message is still displayed,
press S1 button or S2 button to move forward or
backward respectively the displayed date by one
day. Press and hold the corresponding buttons
to reinitiate date scanning. Scanning will stop
automatically if the last date for which there is no
tide data is reached.
NOTE: If there is no tide data for the date, the
message “NO TIDE DATA FOR THE DATE” will be
displayed.
NOTE: The time and calendar format will be the
same as that of the NORMAL TIME mode.
TO USE THE CHRONOGRAPH:
1. Press S3 button to select CHRONOGRAPH mode.
2. The chronograph will be displayed in its current
state – stopped, running or reset.
3. To resume a stopped counting, press S1 button
to resume from where it left off.
4. To start a new counting, reset the chronograph
to zero rst.Press S2 button to stop counting,
then press and hold S2 button to reset counter
to zero.
For the measurement of elapsed time:
In CHRONOGRAPH mode,
1. Press S1 button to start counting.
2. To stop counting, press S2 button. Press S1
button to resume from where it left off.
3. To reset to zero, press S2 button to stop counting
and then press and hold S2 button.
NOTE: You can leave the chronograph running
while switching over to other operating modes.
The chronograph indicator
will be displayed in
NORMAL TIME mode and FOREIGN TIME mode
when the timer is in use.
NOTE: The chronograph can count up to a maxi-
mum time of 99:59.59.99 (99 hours:59 minutes.59
seconds.99 hundredths).
TO SET THE TIMER:
1. Press S3 button to select TIMER mode.
2. Press and hold S4 button for approximately 4
seconds, the message “SET TIMER” will be
displayed and the hour digits will blink. Press
S1 button to increase the digits by one unit or
press S2 button to decrease the digits by one
unit. Holding down either button will speed up
the process.
3. Press S3 button, the minute digits will blink.
Press S1 button to increase the digits by one
unit or press S2 button to decrease the digits by
one unit. Holding down either button will speed
up the process.
4. Press S3 button, the second digits will blink.
Press S1 button to increase the digits by one
unit or press S2 button to decrease the digits by
one unit. Holding down either button will speed
up the process.
5. Press S3 button, the action-at-end* setting will
blink. Press S1 button or S2 button to select
among STOP AT END, REPEAT AT END and
UP AT END.
6. When nished making all the settings, press S4
button to conrm the settings.
NOTE*: Illustration of the action-at-end setting:
a) STOP AT END – the timer will stop when the
countdown reaches zero.
b) REPEAT AT END – the timer will reload and
repeat the countdown when the countdown
reaches zero with repetition number updated.
c) UP AT END – the timer will count up to a maxi-
mum of 23 hours, 59 minutes and 59 seconds
when the countdown reaches zero.
TO USE THE TIMER:
1. Press S3 button to select TIMER mode.
2. Press S1 button to start counting.
3. To stop counting, press S2 button. Press S1 but-
ton to resume from where it left off.
4. To reload the timer, press S2 button to stop
counting and then press S2 button again.
5. Upon completion of a countdown, the watch
will react according to the action-at-end setting
selected:
If STOP AT END is selected, the timer will stop
when the countdown reaches zero. A timer alert
tune will be emitted and the backlight will ash.
If REPEAT AT END is selected, the timer will
reload and repeat the countdown when the
countdown reaches zero with repetition number
updated. If the timer is set to be less than 30
seconds, the timer will repeat with a beep gener-
ated; if the timer is set to be 30 seconds or more,
the timer will repeat with a timer alert tune
generated and the backlight will ash.
If UP AT END is selected, the timer will count up
to a maximum of 23 hours, 59 minutes and 59
seconds when the countdown reaches zero. A
timer alert tune will be emitted and the backlight
will ash.
NOTE: Regardless of the action-at-end setting
selected, when a countdown reaches the nal 1
minute, a “beep-beep-beep” sound will be emitted.
When it reaches the nal 30 seconds, a “beep-
beep” sound will be emitted. When it reaches the
nal 10 seconds, a “beep” sound will be emitted
every second.
NOTE: You can leave the timer running while
switching over to other operating modes. The timer
indicator
(STOP AT END) / (REPEAT AT END)
/
(UP AT END) will be displayed in NORMAL
TIME mode and FOREIGN TIME mode when the
timer is in use.
TO SET THE HEAT TIMER:
1. Press S3 button to select HEAT TIMER mode.
2. Press and hold S4 button for approximately 4
seconds, the message “SET HEAT TIMER” will be
displayed and the minute digits will blink.
3. Press S1 button to increase the digits by ve
units, or press S2 button to decrease the digits
by ve units. Holding down either button will
speed up the process.
4. When nished making all the settings, press S4
button to conrm.
NOTE: The heat timer can count up to a maximum
time of 35.00 (35 minutes).
TO USE THE HEAT TIMER:
1. Press S3 button to select HEAT TIMER mode.
2. Press S1 button to start counting.
3. To stop counting, press S2 button. Press S1
button to resume from where it left off.
4. To reload the heat timer, press S2 button to stop
counting and then press S2 button again.
5. Upon completion of a countdown, a heat timer
alert tune will be emitted and the backlight will
ash.
NOTE: When a countdown reaches the nal 1
minute, a “beep-beep-beep” sound will be emitted.
When it reaches the nal 30 seconds, a “beep-
beep” sound will be emitted. When it reaches the
nal 10 seconds, a “beep” sound will be emitted
every second.
NOTE: You can leave the heat timer running while
switching over to other operating modes. The heat
timer indicator
will be displayed in NORMAL
TIME mode and FOREIGN TIME mode when the
timer is in use.
NOTE: The heat timer is independent of the timer.
Both may be running at the same time.
TO SET THE ALARM TIME:
1. Press S3 button to select ALARM mode.
2. Press and hold S4 button for approximately 4
seconds, the message “SET ALARM” will be
displayed and the alarm entry setting will blink.
Press S1 button or S2 button to toggle between
ALARM 1 and ALARM 2 to set.
3. Press S3 button, the hour digits (including
A.M./P.M. for 12-hour format) will blink. Press
S1 button to increase the digits by one unit or
press S2 button to decrease the digits by one
unit. Holding down either button will speed up
the process.
SHARK-FS1204-CLASSIC TIDE-AG9151-R01
Current date
Time of the
next sunset


この商品に関する会話に参加する
ここでは、Freestyle Shark Classic Tide 時計 についての意見を共有できます。 疑問がある場合は、まず説明書をよく読んでください。 マニュアルのご請求は、お問い合わせフォームより承ります。